Hyosung Aquila Classic GV700C Manual
Read below 📖 the manual in Italian for Hyosung Aquila Classic GV700C (94 pages) in the Motor category. This guide has been helpful for 12 people and has been rated 4.5 stars on average by 2 users
Page 1/94

This owner’s manual contains important safety information.
Please read it carefully.
WARNING
AUSTRALIA

1
This manual should be considered a permanent part of the motorcycle and
should remain with the motorcycle when resold or otherwise transferred to
a new owner or operator. The manual contains important safety informa-
tion and instructions which should be read carefully before operating the
motorcycle.

2
BATTERY INITIAL CHARGING
uses a battery ignition system.
Do not permit to start or operate the motorcycle without the battery otherwise the elec-
trical system will be damage.
Always start or ride the motorcycle with the correct battery installed and connected.
WARNING
Do not use the battery without the battery initial charging.
Otherwise the battery service life may be shortened.
1. BATTERY INITIAL CHARGING
Initial charging of the battery is required after filling electrolyte to improve the battery dura-
bility.
2. BATTERY INSTALLATION
①Fill the electrolyte to the battery.
②Leave the battery for 30 minutes.
③Charge the battery by standard charging. This is necessary for reliability of the battery.
④Install the battery to the motorcycle.
`※ STANDARD CHARGING TIME : 1.2 A for 10 hours
CAUTION

3
All information, illustrations photographs
and specifications contained in this manual
are based on the latest product information
available at the time of publication. Due to
improvements or other changes, there may
be some discrepancies between information
in this manual and your motorcycle.
Hyosung reserves the right to make
changes at any time, without notice and
without incurring any obligation to make the
same or similar changes to motorcycles
previously built or sold.
Please note that this manual applies to all
specifications for all respective destinations
and explains all equipments. Therefore,
your model may have different standard
features than shown in this manual.
COPYRIGHT S&T Motors Co., Ltd.
FOREWORD
THANK YOU for choosing a Hyosung
motorcycle. We at Hyosung have
designed, tested and produced this motor-
cycle using the most modern technology
available to provide you with many years of
enjoyable, safe riding. Motorcycling is one of
the most exhilarating sports and to ensure
your riding enjoyment, you should become
thoroughly familiar with the information pre-
sented in this Owner's Manual before riding
the motorcycle.
The proper care and maintenance that
your motorcycle requires is outlined in this
manual.
By following these instructions explicitly
you will ensure a long trouble-free operating
life for your motorcycle. Your Hyosung
dealer has experienced technicians that are
trained to provide your machine with the
best possible service with the right tools and
equipment.

4
IMPORTANT
BREAK-IN INFORMATION FOR
YOUR MOTORCYCLE
The first 1,600 km (1,000 miles) are the
most important in the life of your motorcycle.
Proper break-in operation during this time
will help ensure maximum life and perfor-
mance from your new motorcycle.
Hyosung parts are manufactured of high
quality materials, and manufactured parts
are finished to close tolerances. Proper
break-in operation allows the machined sur-
faces to polish each other and mate
smoothly.
Motorcycle reliability and performance
depend on special care and restraint exer-
cised during the break-in period. It is espe-
cially important that you avoid operating the
engine in a manner which could expose the
engine parts to excessive heat.
Please refer to the BREAK-IN section for
specific break-in recommendations.
WARNING / CAUTION / NOTE
Please read this manual and follow its
instructions carefully.
To emphasize special information the
words 『 』WARNING , 『 』CAUTION and
『NOTE』have special meanings.
Information following these signal words
should be carefully reviewed.
These instructions point out special ser-
vice procedures or precautions that
must be followed to avoid damaging the
machine.
The personal safety of the rider may be
involved. Disregarding this information
could result in injury to the rider.
WARNING
CAUTION
N O T E
This provides special information to
make maintenance easier or important
instructions clearer.

WARNING
5
Noise Control System (muffler assembly)
TAMPERING WITH NOISE CONTROL SYSTEM PROHIBITED
Owners are warned that the law may prohibit :
(a) The removal or rendering inoperative by any person other than for the
purpose of maintenance, repair or replacement, of any device or ele-
ment of design incorporated into any new vehicle for the purpose of
noise control prior to its any sale or delivery to the ultimate purchaser or
while it is in use ; and
(b) The use of the vehicle after such device or element of design has been
removed or rendered inoperative by any person.
MAINTENANCE :
The exhaust system of this motorcycle requires no periodic maintenance.
The engine should be adjusted to the manufacture’ s specifications and the
spark plug should be kept in good condition. Running the engine with
incorrectly operating spark plug or misadjusted fuel injection system may
cause permanent damage to the catalyst and to the noise control system.

WARNING
WARNING
6
Motorcycle riding is great fun and an excit-
ing sport. Motorcycle riding also requires
that some extra precautions be taken to
ensure the safety of the rider and passen-
ger. These precautions are :
●
●
●
●
●Before first use of
read this owner’s manual
carefully to become familiar with the
motorcycle features, and safety and
maintenance requirements.
Review all instructions, requirements
and warnings with the riders. Keep
the owners manual in the owners
manual storage compartment located
under the seat.
●
●
●
●
●Before the rider’s first use of
, make sure
that he / she is familiar with the loca-
tion and operation of all controls, and
has been instructed in the proper
operation of the motorcycle.
●
●
●
●
●For first use of
, find a level, open area for
the rider to use to become familiar
with the operation of controls and the
operating and handling characteris-
tics of the motorcycle
.
●
●
●
●
●Before each use, perform daily
inspections with the rider. Specific
items to check are listed in the
INSPECTION BEFORE RIDING sec-
tion on page 50 of this owner’s man-
ual.
●
●
●
●
●Make sure the rider wears a helmet,
eye protection, and protective cloth-
ing (gloves, leather or heavy cloth
pants, long sleeved shirt or jacket,
boots).
●
●
●
●
●Permit use only by two persons.
The motorcycle is designed for use
only by one rider and one passenger.
●
●
●
●
●Do not permit anyone to operate
under the
influence of alcohol or other drugs.
It may cause damage to the motorcy-
cle and alter handling characteristics.
●
●
●
●
●Observe periodic maintenance
requirements. Your authorized
HYOSUNG dealer is trained and
equipped to perform this service.
●
●
●
●
●Drain gasoline from the fuel tank
prior to transporting
.
●
●
●
●
●Caution the rider and others near
not to get
close to or touch any moving parts or
any heated areas such as the engine
and exhaust system.
●
●
●
●
●Do not make any modifications to
.
Modifications may make the motor-
cycle unsafe or illegal in your state.
CONSUMER INFORMATION
SAFE RIDING RECOMMENDATION
FOR MOTORCYCLE RIDERS

CAUTION
CAUTION
WARNING
WARNING
WARNING
WARNING
WARNING
WARNING
7
is equipped
with the side stand ignition interlock
system.
If the transmission is in neutral or side
stand up, you can only start the engine
by pulling in the clutch lever.
This side stand ignition interlock system
prevents the motorcycle from being
started with side stand down.
Make sure that the side stand ignition
interlock system is working properly
before riding.
●
●
●
●
●Do not run the engine indoors or
where there is little or no ventilation.
Exhaust gases contain carbon
monoxide, a potentially lethal gas that
is colorless and odorless.
●
●
●
●
●Never leave the motorcycle running
while unattended, even for a short
time.
The head lamp, position lamp, meter
lamp, tail lamp and license plate lamp on
this motorcycle always comes on when
the ignition switch is turned to the “ON”
position.
While operating
, the rider should keep both
feet on the footrests at all times, to avoid
injuries resulting from accidents.
Moving the rider’s feet from the
footrests reduces the rider’s ability to
control the motorcycle and could lead to
an accident.
Keep both hands on the handgrips at all
times when riding. Removing your
hands from the handgrips reduces your
ability to control the motorcycle, and
could result in an accident.
Always open the throttle gradually to
prevent front wheel lifting. Failure to
observe this precaution may result in
loss of control and an accident.
WHEN STORING FOR LONG PERIOD :
1. Fully fill the tank with fuel.
2. Remove the battery from the motorcy-
cle.
Do not turn the ignition switch to its
“OFF” position or the steering lock to
lock or the engine stop switch to its
“ ” position whilst riding the motorcy-
cle.

WARNING WARNING
WARNING
WARNING
WARNING
WARNING
8
⊙
⊙
⊙
⊙
⊙WEAR A HELMET
⊙
⊙
⊙
⊙
⊙RIDING APPAREL
⊙
⊙
⊙
⊙
⊙INSPECTION BEFORE RIDING
⊙
⊙
⊙
⊙
⊙FAMILIARIZE YOURSELF WITH
THE MOTORCYCLE
⊙
⊙
⊙
⊙
⊙KNOW YOUR LIMITS
⊙
⊙
⊙
⊙
⊙BE EXTRA SAFETY CONSCIOUS
ON BAD WEATHER DAYS
Motorcycle safety equipment starts with
a quality safety helmet. One of the most
serious injuries that can happen is a
head injury. ALWAYS wear a properly
approved helmet. You should also wear
a suitable eye protection.
Loose clothing can be uncomfortable
and unsafe when riding a motorcycle.
Use good quality motorcycle riding
apparel when riding your motorcycle.
Review thoroughly the instructions in
the “INSPECTION BEFORE RIDING”
section of this manual. Do not forget to
perform an entire safety inspection to
ensure the safety of the rider and its
passenger.
Your riding skill and mechanical knowl-
edge from the foundation for safe riding
practices.
We suggest that you practice riding
your motorcycle in a non-traffic situation
until you are thoroughly familiar with
your machine and its controls.
Remember practice makes perfect.
Ride within the boundaries of your own
skill at all times. Knowing these limits
and staying within them will help you to
avoid accidents.
Riding on bad weather days, especially
wet ones, requires extra caution.
Braking distances double on a rainy
day. Stay off of the painted surface
marks, manhole covers and greasy
appearing areas as they can be espe-
cially slippery.
Use extreme caution at railway cross-
ings and on metal gratings and bridges.
Whenever you have a doubt about road
condition, slow down!

10
Modification of the motorcycle, or removal of
original equipment may render the vehicle
unsafe or illegal.
Obey all applicable equipment regulations in
your area.
This limits the freedom of movement of
the rider and may limit his or her control
ability.
6. Additional electrical accessories may
damage the existing electrical system.
Severe overloads may damage the
wiring harness or create a dangerous
situation due to the loss of electrical
power during the operation of the
motorcycle.
When carrying a load on the motorcycle,
mount it as low as possible and as close as
possible to the machine. An improperly
mounted load can create a high center of
gravity which is very dangerous and makes
the motorcycle difficult to handle. The size
of the “load” can also affect the aerodynam-
ics and handling of the motorcycle.
Balance the load between the left and
right side of the motorcycle and fasten it
securely.
MODIFICATION

11

1. SERIAL NUMBER LOCATION 14················
2. FUEL, ENGINE OIL AND ENGINE COOLANT
RECOMMENDATION 15····················
FUEL
ENGINE OIL
ENGINE COOLANT SOLUTION
3. NAMES OF EACH PARTS ··················18
4. CONTROLS ························· 21
IGNITION SWITCH
STEERING LOCK
IGNITION KEY
INSTRUMENT PANEL
LEFT HANDLE SWITCHES
RIGHT HANDLE SWITCHES
FRONT BRAKE LEVER ADJUSTMENT
REAR BRAKE PEDAL
GEARSHIFT LEVER
FOOTRESTS
SIDE STAND
SEAT LOCK
REAR SHOCK ABSORBER
HELMET HOLDER
5. SUPPLY OF GASOLINE, ENGINE OIL AND
ENGINE COOLANT····················· 36
GASOLINE
ENGINE OIL
ENGINE COOLANT
6. RIDING TIPS 44·························
STARTING THE ENGINE
STARTING OFF
USING THE TRANSMISSION
RIDING ON HILLS
STOPPING AND PARKING
7. BREAK-IN 48··························
TABLE OF CONTENTS
12

13
8. INSPECTION BEFORE RIDING ················50
9. PERIODIC MAINTENANCE ·················· 52
10. INSPECTION AND MAINTENANCE ·············56
TOOL
ENGINE OIL
GASOLINE
FUEL HOSE
ENGINE COOLANT
RADIATOR
RUBBER CAP OF CABLES
EXHAUST PIPE AND MUFFLER
FRONT AND REAR SUSPENSIONS
REAR-VIEW MIRRORS
REFLECTOR
BATTERY
AIR CLEANER
SPARK PLUG
IDLING ADJUSTMENT
THROTTLE CABLE PLAY ADJUSTMENT
CLUTCH CABLE ADJUSTMENT
DRIVE BELT
BRAKES
TIRES
BULBS
11. TROUBLESHOOTING ····················79
12. TRANSPORT ························81
13. CLEANING PROCEDURE ··················81
14. STORAGE PROCEDURE ··················83
15. LABEL····························84
16. SPECIFICATIONS [ ]···············87
17. SPECIFICATIONS [ ]···············89

14
Frame number :
Engine number :
Please write down the numbers in the box
provided below for your future reference.
The frame serial number
①
is stamped on
the right side of the steering head tube.
The engine serial number
②
is stamped
on the left downside of the crankcase
assembly.
The frame and/or engine serial numbers
are used to register the motorcycle. They
are also to assist your dealer in terms of
ordering parts or referring to special ser-
vice information.
The frame number is also known as the
VIN or Vehicle Identification Number.
SERIAL NUMBER LOCATION
❶
❷

N O T E
WARNING
CAUTION
15
F U E L
ENGINE OIL
Classification
system
API
SAE
Grade
Over SL
10W/40
Remarks
⊙
⊙
⊙
⊙
⊙ENGINE OIL SPECIFICATION
Use unleaded gasoline with an octane
rating of 91 or higher.
Unleaded gasoline can extend spark plug
life and exhaust components life.
Oil quality is a major contributor to your
engine’s performance and life.
Always select good quality engine oil.
Using a premium quality four stroke motor
oil will increase the service life of your
motorcycle.
※
If a SAE 10W/40 motor oil is not avail-
able, select alternative according to the
following chart.
FUEL, ENGINE OIL AND
ENGINE COOLANT
RECOMMENDATION
●When refueling, always shut the
engine off and the ignition keyturn
to the “OFF” position.
Never refuel near the flames, sparks
and heat sources.
●Do not overfill the fuel tank.
Do not fill gasoline above the fuel
tank entrance lower end.
Spilling gasoline can damage the paint-
ed surfaces.
Be careful not to spill any fuel when fill-
ing the fuel tank.
Wipe spilled gasoline up immediately.
Use the chart to select a viscosity rating
based on temperature range in your area.
In very cold weather [below
-
15
℃
℃
℃
℃
℃
(5
˚
˚
˚
˚
˚
F)], use SAE 5W/30 for good starting
and smooth operation.
ENGINE OIL
Temperature
℃
℉
-30
-22
-20
-4
-10
14
0
32
10
50
20
68
30
86
40
104
20W50
15W40 15W50
10W40 10W50
10W30
5W30

CAUTION
WARNING
WARNING
16
ENGINE COOLANT SOLUTION
Use an engine coolant that is compatible
with aluminum radiator, mixed with distilled
water only at a 50 : 50 mixture ratio for
engine coolant solution.
An engine coolant mixture other than
50 : 50 can affect cooling efficiency or rust
inhibiting peformance.
Engine coolant is harmful or fatal if
swallowed or inhaled.
Do not drink anti-freeze or coolant
solution. If swallowed, do induce
vomiting. Immediately contact a poi-
son control center or a physician.
Avoid inhaling mist or hot vapors ; if
inhaled, remove to fresh air. If coolant
gets in eyes, flush eyes with water
and seek medical attention. Wash
thoroughly after handling. Solution
can be poisonous to animals.
Keep out of the reach of children and
animals.
Spilled engine coolant can damage
painted surfaces.
Do not spill any fluid when filling the
radiator. Wipe spilled engine coolant
up immediately.
⊙
⊙
⊙
⊙
⊙WATER FOR MIXING
Use distilled water only.
Water other than distilled water can cor-
rode and clog the aluminum radiator.
●Don’t mix the unrecommended oil.
It could damage the engine.
●When refilling the oil, don’t allow the
dust to get inside.
●Wipe the spilled oil up immediately.

N O T E
17
This 50
%
%
%
%
%
mixture will protect the cooling
system from freezing at temperatures
above
-
31
℃
℃
℃
℃
℃
.
If the motorcycle is to be exposed to
temperature below
-
31
℃
℃
℃
℃
℃
,
,
,
,
,
this mixing
ratio should be increased up to 55
%
%
%
%
%
(
-
40
℃
℃
℃
℃
℃
) or 60
%
%
%
%
%
(
-
55
℃
℃
℃
℃
℃
).
The mixing ratio should not exceed
60
%
%
%
%
%
.
⊙
⊙
⊙
⊙
⊙ENGINE COOLANT
The engine coolant performs as rust
inhibitor and water pump lubricant as well
as anti-freeze.
Therefore the engine coolant should be
used at all times even though the atmos-
pheric temperature in your area does not
go down to freezing point.
50%
Water
Engine coolant
0.8
ℓ
0.8
ℓ
Required amount of water / coolant
Solution capacity (total) 1.6
ℓ
⊙
⊙
⊙
⊙
⊙COOLANT RESERVOIR TANK
☞Refer to 42 page.

18
NAMES OF EACH PARTS
①Clutch lever
②Left handle switches
③Instrument panel
④Front brake fluid reservoir
⑤Right handle switches
⑥Front brake lever
⑦Throttle grip
⑧Fuel tank cap
❶
❹
❼
❽
❸
❷❺
❻

N O T E
19
⑨Spark plug (Front)
⑩Front turn signal lamp
⑪Head lamp & Position lamp
⑫Ignition coil (Rear)
⑬Spark plug (Rear)
⑭Front seat lock
⑮Battery & Fuses
⒃Passenger footrests
⒔Rear seat mounting bolt
⒕Rear turn signal lamp
⒖License plate lamp
⒗Brake / Tail lamp
Helmet holder
Belt case inspecting hole
Side stand
Coolant reserve tank
Engine oil drain plug
Footrests
Gearshift lever
“ ”
:
:
:
:
:
means the invisable parts.
❾
❿

20
Muffler
Rear seat
Front seat
Tools
ECU (Engine Control Unit)
Front brake fluid reservoir
Front brake lamp switch
Ignition coil (Front)
Radiator cap
Rear brake fluid reservoir
Radiator
Cooling fan and motor
Rear brake pedal
Rear brake lamp switch
Engine oil filter
Water pump
Engine oil level lens
Air cleaner
Engine oil filler plug
“ ”
:
:
:
:
:
means the invisable parts.
N O T E
31 32
33
34
35
36
37
38
39
40
41
42
4344
45
46

N O T E
WARNING
21
have the igni-
tion switch at the rightside of the motorcycle.
The ignition switch has two positions :
⊙
⊙
⊙
⊙
⊙
“
OFF
”
POSITION
All electrical circuits are cut off.
The engine will not start. The key can be
removed.
⊙
⊙
⊙
⊙
⊙
“
ON
”
POSITION
The ignition circuit is completed and the
engine can now be started.
The key cannot be removed from the igni-
tion switch in this position.
CONTROLS
IGNITION SWITCH
Turning the ignition switch to the “OFF”
position while the motorcycle is moving
can be hazardous.
Start the engine after turning the key to
the “ON” position, or the battery will
lose power due to consumption by the
lamp.
KEY

WARNING
22
IGNITION KEY
Do not operate the steering lock dur-
ing riding.
Moving the motorcycle while the steer-
ing is locked can be hazardous. You
could lose your balance and fall, or you
could drop the motorcycle.
Stop the motorcycle and place it on the
side stand if equipped before locking
the steering. Never attempt to move the
motorcycle when the steering is locked.
have the steer-
ing lock below the steering head tube.
To lock the steering :
①Turn the handlebar all the way to the
left.
②Insert the ignition key into the steering
lock, and turn it clockwise from the
“ ●” position.
③Remove the ignition key.
To release the steering :
Insert the ignition key into the steering
lock, and turn it counter-clockwise from the
“●” position.
come equipp-
ed with two ignition keys.
Keep the spare key in a safe place.
STEERING LOCK

N O T E
WARNING
CAUTION
CAUTION
23
③
③
③
③
③
NEUTRAL INDICATOR LAMP
The green neutral indicator lamp will
come on when the transmission is in neu-
tral.
The lamp will go out when you shift into
any gear other than neutral.
④
④
④
④
④
COOLANT TEMPERATURE WARNING
LAMP
The red coolant temperature warning
lamp will come on when the coolant gets
too hot while operating.
When coolant temperature is higher than
120 (248 ), the coolant temperature
warning lamp comes on.
①
①
①
①
①
TURN SIGNAL INDICATOR LAMP
When the turn signals are being operated
either to the right or to the left, the green
indicator will flash at the same time.
②
②
②
②
②
HIGH BEAM INDICATOR LAMP
The blue high beam indicator lamp will
come on when the head lamp high beam is
turned on.
INSTRUMENT PANEL
When the ignition switch is turned to the
“ON” position, the display of speedome-
ter will come on.
Operating the display of the instrument
panel while riding can be hazardous.
Removing a hand from the handlebars
can reduce your ability to control the
motorcycle.
Always keep both hands on the handle-
bars while riding.
Operating the motorcycle while the
coolant temperature warning lamp is lit
can damage your motorcycle.
Continued operation of the motorcycle
with high engine coolant temperature
may result in engine damage or prema-
ture wear.
If the coolant temperature warning lamp
comes on, stop the engine and allow it
to cool before restarting.
Refer to the note below.
●
●
●
●
●High engine speed, low vehicle
speeds, or heavy load can increase
engine coolant temperature.
Decrease engine speed, reduce
load and select an appropriate
transmission gear to lower the
temperature.
●
●
●
●
●Debris or mud in front of the
engine or packed between the radi-
ator fins can reduce cooling ability.
Remove any debris or mud pre-
venting air flow to the engine.
❶
❷
❹❼
❻
❺
❿
❸
❶
❽ ❾
25
⑦
⑦
⑦
⑦
⑦
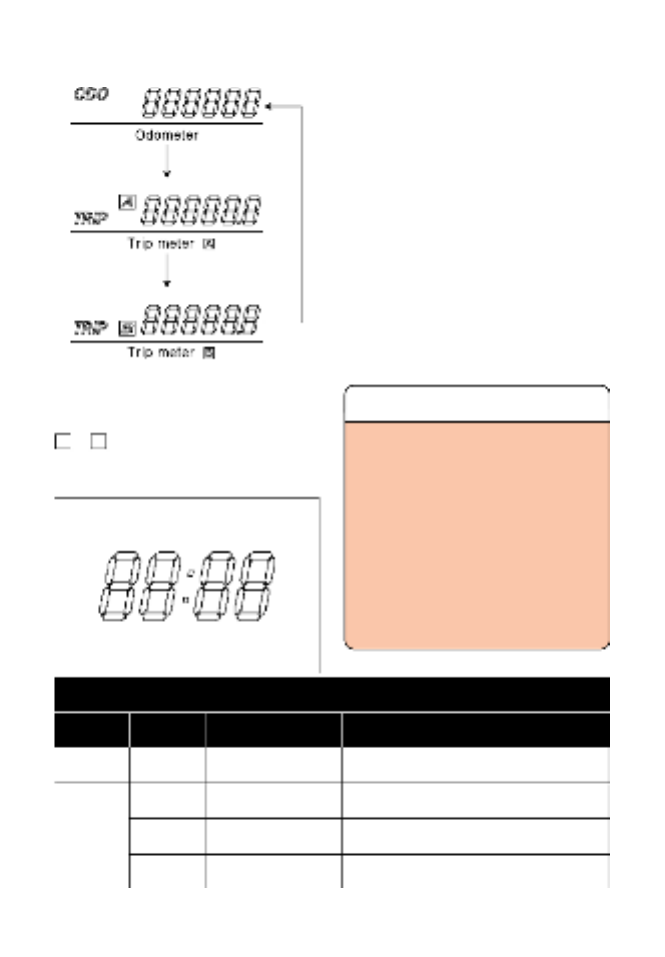
CLOCK
The clock indicates 12-hour mode.
Follow the procedure below to adjust the
clock.
1. Push the switch ⑧(in the normal mode)
for 2 ~ 4 seconds until the hour and min-
utes display blink.
1. It is the clock reset mode.
2. Adjust the hour display by pushing the
switch ⑨(in the clock reset mode) for
0.6 ~ 1 seconds.
3. Adjust the minutes display by pushing
the switch ⑧(in the clock reset mode)
for 0.6 ~ 1 seconds.
4. Push the switch ⑧(in the clock reset
mode) for 2 seconds to resume in the
normal mode.
To reset the trip meter to zero, push the
switch ⑨(in the normal mode) for 2 sec-
onds while the display indicates trip meter
Bor B you want to reset.
A B
Normal
Clock
reset
mode
Mode
Select (⑧)
Reset (⑨)
Select (⑧)
Select (⑧)
2 ~ 4 seconds
0.6 ~ 1 seconds
0.6 ~ 1 seconds
2 seconds
Normal mode Clock reset mode→
Increase the hour of clock
Increase the minutes of clock
Clock reset mode →Normal mode
Switch Push it for Adjustment
CLOCK ADJUSTMENT
N O T E
If push the switch
⑧
⑧
⑧
⑧
⑧
(in the normal
mode) for 5 seconds, request to check
the malfunction item’s code of the elec-
tric fuel injection.
This time, if not connect the special tool,
the clock indicates the “cHE” letters
then disappear.
The special tool and maintenance
knowledge is necessary to read the
code of the malfunction items.
Contact an authorized Hyosung dealer
to check the malfunction item’s code.

CAUTION
CAUTION
WARNING
26
Riding the motorcycle with the “FI”
check lamp lit can damage the engine
and transmission.
Whenever the “FI” check lamp is lit,
have your authorized Hyosung dealer or
a qualified mechanic inspect the electric
fuel injection system as soon as possi-
ble.
If the “FI” check lamp does not come on
when the ignition switch is set to “ON”
position with the engine stopped or fail
to go out after the engine start, contact
an authorized Hyosung dealer.
⑧
⑧
⑧
⑧
⑧
SELECT SWITCH
Use this switch to adjust the following :
●
In the normal mode
Push it for
2 ~ 4
seconds
5 seconds
Normal mode
→
Clock reset mode
Request to check the mal-
function item’s code
(Malfunction code mode)
●
In the clock reset mode
Push it for
0.6 ~ 1
seconds
Adjustment
Adjustment
Increase the minutes of clock
2 seconds Clock reset mode
→
Normal mode
⑨
⑨
⑨
⑨
⑨
RESET SWITCH
Use this switch to adjust the following :
●
In the normal mode
Push it for
2 seconds
Adjustment
Reset the trip meter to zero,
while the display indicates
trip meter or
0.6 ~ 1
seconds
Odometer
→
Trip meter
→
Trip meter
→
Odometer
●
In the clock reset mode
Push it for
0.6 ~ 1
seconds
Adjustment
Increase the hour of clock
A
B
A B
●
In the malfunction code mode
Push it for
0.6 ~ 1
seconds
Adjustment
End of the malfunction
code mode
⑩
⑩
⑩
⑩
⑩
SPEEDOMETER
The speedometer indicates the road
speed in kilometers or miles per hour.
⑪
⑪
⑪
⑪
⑪
“FI” (Fuel Injection) CHECK LAMP
It comes on when the ignition switch is set
to “ON” position with the engine stopped as
a test of injection system operation.
As soon as the engine starts, this lamp
should go out.
If the fuel injection system fails, the red
“FI” check lamp ⑪comes on.
Obey the speed limit and traffic regula-
tion at all times.

WARNING
CAUTION
CAUTION
CAUTION
CAUTION
②
②
②
②
②
“PASS ” SWITCH
Press the “PASS” switch to operate the
head lamp high beam for using when pass.
With the ignition switch in the “ON” posi-
tion, push the “PASS” switch to operate the
head lamp high beam.
27
①
①
①
①
①
CLUTCH LEVER
The clutch lever is used for disengaging
the drive to the rear wheel when starting
the engine or shifting the transmission gear.
Squeezing the lever disengages the
clutch.
LEFT HANDLE SWITCHES
Do not operate when the dimmer switch
“ ” position.
Use the clutch properly.
Otherwise, the clutch may be worn
quickly.
⑤
⑤
⑤
⑤
⑤
HORN SWITCH
Press the switch to operate the horn.
④
④
④
④
④
TURN SIGNAL SWITCH
Using when left, right turn or change
direction.
⊙ “ ” Position : Flash the left turn sig-
nal lamp.
⊙ “ ” Position : Flash the left turn sig-
nal lamp.
⊙“
△
” (OFF) : Pushing the “
△
” position
will stop the turn signal
lamp to operate.
③
③
③
③
③
DIMMER SWITCH
Change the direction of head lamp light.
⊙“ ” : The head lamp high beam
come on.
The high beam indicator lamp
also comes on.
⊙“ ” : The head lamp low beam
come on.
Set the dimmer switch “ ” when other
vehicle is running in front or against.
Always use the turn signals when you
intend to change lanes or make a turn.
Always be sure to turn turnthe signal
switch to the “OFF” position after com-
pleting the turn or lane change.
Use the horn switch only in case of
need.
❹
❺
❶❷❸

CAUTION
WARNING
WARNING
WARNING
28
Turn off the hazard warning switch
promptly after use.
If the motorcycle is ridden with the haz-
ard warning switch turned on, it may
confuse other drivers.
The battery will eventually become
depleted if the hazards warning remains
on for a period of time without the
engine running.
④
④
④
④
④
HAZARD WARNING SWITCH
⊙“ ” : All four turn signal lamp and
indicator lamp will flash simul-
taneously when the switch is
turned on with the ignition
switch in “
ON
” position.
⊙“ ” : The turn signal lamp and indi-
cator lamp go off.
Use the hazard warning lamps to warn
other traffic during emergency parking or
when your vehicle could otherwise become
a traffic hazard.
③
③
③
③
③
THROTTLE GRIP
Engine speed is controlled by position of
the throttle grip. Turn it toward you to
increase engine speed. Turn it away from
you to decrease the engine speed.
Apply the brake lightly and with great
care on slippery surfaces to avoid skid-
ding.
Avoid turning the throttle grip during
braking.
②
②
②
②
②
FRONT BRAKE LEVER
The front brake is applied by squeezing
the brake lever gently toward the throttle-
grip.
The front brake is a powerful disc brake
system. Do not brake excessively so as to
cause the front wheel to lock up or skid.
The brake lamp will come on when the
lever is squeezed.
Do not operate the engine stop switch
into the “ ” position while driving at
one’s pleasure.
①
①
①
①
①
ENGINE STOP SWITCH
⊙“ ” Position : Use in emergency or
when motorcycle has fallen over
to stop engine quickly.
The ignition circuit is off. The
engine cannot start or run.
⊙“ ” Position : The ignition circuit is on
and the engine can start and run.
Keep in this position for normal
engine operation.
RIGHT HANDLE SWITCHES
❶❷
❸
❹
❺

WARNING
CAUTION
CAUTION
CAUTION
29
●Release the starter switch immediate-
ly after the motorcycle has started.
●Do not engage the starting motor for
more than five seconds at a time as it
may overheat the wiring harness and
starting motor.
If the engine does not start after sever-
al attempts, check the fuel supply and
igintion system. (Refer for Page 79 )
In case of , do
not attempt the start the engine until
the needle of the speedometer com-
pletes a full sweep and returns to the
rest position otherwise the engine will
start badly.
If the engine does not start or runs
badly, turn the ignition switch to the
“OFF” position. After 8 seconds, turn
the ignition switch on, allow the
speedometer needle to complete it’s
sweep and return to the rest position
and then attempt to restart. This
allows the ISC (Idling Speed Control)
solenoid to be initialized.
⑤
⑤
⑤
⑤
⑤
STARTER SWITCH
Use this switch to operate the starting
motor.
With the ignition switch in the “ON” posi-
tion, the engine stop switch in the “ ”
position, and the transmission is in neutral,
squeeze the clutch lever and the side stand
up and push the starter switch to start the
engine.
When the ignition switch is set to “ON”
position with the engine stopped, the meter
lamp will come on and the needle of the
speedometer will turn once to the end as a
test of electric system operation.
Push the starter switch after the needle of
the speedometer turn back.
is equipped
with the side stand ignition interlock
system.
If the transmission is in neutral or side
stand up, you can only start the engine
by pulling in the clutch lever.
This side stand ignition interlock system
prevents the motorcycle from being
started with side stand down.
Make sure that the side stand ignition
interlock system is working properly
before riding.
The head lamp, position lamp, meter
lamp, tail lamp and license plate lamp on
this motorcycle always comes on when
the ignition switch is turned to the “ON”
position.

WARNING
WARNING
30
Depressing the rear brake pedal will
apply the rear brake.
The brake lamp will be illuminated when
the rear brake is operated.
REAR BRAKE PEDAL
Apply the brake lightly and with great
care on slippery surfaces to avoid skid-
ding.
The distance between the throttle grip
and the front brake lever is adjustable
among six positions.
To change the position, push the brake
lever forward and turn the adjuster to
the desired position ( “ ” mark of the front
brake lever holder).
When changing the brake lever position,
always be sure the adjuster stops in the
proper position ; a projection of the brake
lever holder should fit into the depression of
the adjuster .
The are deliv-
ered from the factory with its adjuster set on
position 6.
Position 1 provides the widest distance
and position 6 provides narrowest distance.
FRONT BRAKE LEVER
ADJUSTMENT
Never attempt to change the front brake
lever position while riding, or you may
lose control.

CAUTION
31
have a 5-speed
transmission which operates as shown.
To shift properly, squeeze the clutch lever
and close the throttle at the same time you
operate the gearshift lever.
Whenever a gear is selected, the
gearshift lever will return to its normal posi-
tion ready to select the next gear.
Lift the gearshift lever to upshift and
depress the lever to downshift.
Neutral is located between first and 2nd
gear.
When neutral is desired, depress or lift
the lever halfway between first and 2nd
gear.
It is not possible to upshift or downshift
more than one gear at a time.
When shifting from first to 2nd gear or
GEARSHIFT LEVER
2nd gear to low, neutral will be automatical-
ly skipped.
Reduce the motorcycle speed before
down-shifting.
When down-shifting, the engine speed
should be increased before the clutch is
engaged.
This will prevent unnecessary wear on
the drive train components and the rear tire.
When the transmission is in neutral, the
green indicator lamp on the instrument
panel will be lit.
However, even though the lamp is illu-
minated, cautiously release the clutch
lever slowly to determine whether the
transmission is positively in neutral.

WARNING
N O T E
33
⊙
⊙
⊙
⊙
⊙
GEARSHIFT LINK ROD
When the footrests in position ,
exchange the gearshift link rod for appropri-
ate riding position.
●
●
●
●
●Position
: Install the gearshift link rod ④
●
●
●
●
●Position
: Install the gearshift link rod ⑤
NO Neutral
switch Clutch
lever Side
stand Engine
start
are equipped
with the side stand ignition interlock system.
If the transmission is in neutral or side
stand up, you can only start the engine with
squeezing the clutch lever.
This side stand ignition interlock system
prevents the motorcycle from being started
with side stand down.
SIDE STAND
1
2
3
4
5
●
△
●
△
△
●
●
△
●
△
△
●
△
△
●
Possible
Possible
Impossible
Impossible
Impossible
△
●
Off or Down
On or Up
Make sure that the side stand ignition
interlock system is working properly
before riding.
❹
❺

WARNING
WARNING
34
SEAT LOCK
To adjust the spring pre-load, turn the
adjuster clockwise or counter-clockwise to
the desired position using the pin spanner.
Position 1 provides the softest spring pre-
load and position 5 provides the stiffest.
are delivered
from the factory with its adjuster set on
position 2.
REAR SHOCK ABSORBER
Unequal suspension adjustment can
cause poor handling and loss of stability.
Adjust the right and left shock absorber
to the same settings.
①Rear shock absorber
②Pin spanner
Before leaving, make sure that the front
and rear seat are properly locked.
The front seat lock is located the left side
cover under the front seat.
To unlock the front seat, insert the ignition
key into the front seat lock and turn it clock-
wise.
To lock the front seat, push down firmly
until the seat latch snaps into the lock posi-
tion.
To remove the rear seat, loosen the rear
seat mounting bolt on the rearside of the
rear seat.
To install the rear seat, slide the seat
hook into the seat hook retainer and install
the rear seat mounting bolt.
❷
❶

N O T E
WARNING
35
have the “ hel-
met holder ” on the left side of the pillion
rider plate.
When keep a helmet or bag temporally,
use the helmet holder.
To use the helmet holder :
1. Insert the ignition key into the helmet
holder lock and turn it counter-clockwise
from the “ ”position.
2. Hang a helmet’s chin strap or bag’s han-
dle into the bar of the helmet holder after
the helmet holder’s bar come out for the
backside.
3. Push the backside of the helmet holder’s
bar to lock it.
Never ride with the helmet or bag in the
helmet holder.
This may result in injury caused by dam-
age to the vehicle or altered handling
characteristics.
HELMET HOLDER
Loading limit of helmet holder
: 2.5 kgf (5.5 lbs)

WARNING
WARNING
36
Be careful not to spatter the fuel due to
the fuel is hit to the fuel tank inner body
①
in refueling.
To not spatter the fuel from the fuel tank
filler hole
②
, the fuel dispenser’s end
③
is
spaced out 10 mm (0.4 in) from the fuel
tank inner body
①
.
⊙
⊙
⊙
⊙
⊙CAUTION IN REFUELING
Gasoline is extremely flammable and
toxic. Always observe the following
precautions when refueling your
.
●Never permit motorcycle refueling by
anyone other than an adult.
●Refuel in a well ventilated area.
●Make sure the engine is off and
avoid spilling fuel on a hot engine.
●Do not smoke, and make sure there
are no open flames or sparks in the
area.
●Avoid prolonged contact with skin
and breathing of gasoline vapors.
●Keep children and pets away during
refueling.
To open the fuel tank cap :
1. Turn the fuel tank cap cover.
2. Insert the ignition key into the cap lock
and turn it clockwise.
3. With the key inserted, pull out the fuel
tank cap.
To close the fuel tank cap :
1. Align the fuel tank cap’s “ ” mark with
the fuel tank’s groove.
2. Push the cap down firmly with the key in
the cap lock.
3. Remove the ignition key.
GASOLINE
Do not overfill the fuel tank. Stop adding
fuel when the fuel level reaches the bot-
tom of the filler neck. If you fill the tank
beyond this level, fuel may overflow
when it expands due to engine heat or
heating by the sun.
SUPPLY OF GASOLINE,
ENGINE OIL AND
ENGINE COOLANT
↓
↑
10 mm
(0.4 in)
❶
❷
❸

N O T E
N O T E
CAUTION
WARNING
37
⊙
⊙
⊙
⊙
⊙ENGINE OIL LEVEL CHECK
Follow the procedure below to inspect the
engine oil level.
1. Start the engine and run it for a few
minutes.
2.
Stop the engine and wait three minutes
.
Long engine life depends much on the
selection of quality oil and the periodic
changing of the oil.
Daily oil level checks and periodic
changes are two of the most important
maintenances to be performed.
ENGINE OIL
The engine and the components of the
exhaust system become very hot and
remain hot for some time after the
engine has been stopped. Before han-
dling these components, wear insulat-
ing gloves or wait until the engine and
the exhaust system have cooled down.
3. Hold the motorcycle vertically.
Position the motorcycle on firm and flat
ground.
4. Inspect the engine oil level through the
engine oil level lens on the right side on
the engine.
Be sure to use the engine oil specified
in the FUEL, ENGINE OIL AND
ENGINE COOLANT RECOMMENDA-
TION section.
Engine oil expands and oil level increas-
es when the engine oil is hot.
Check and adjust engine oil level when
the engine oil is not hot.

WARNING
WARNING
CAUTION
CAUTION
40
5. Remove the three nuts holding the③
engine oil filter cap in place.⑥
●
●
●
●
●ENGINE OIL FILTER INSTALLATION
HYOSUNG
16510HN910
OUTSIDE
LUSTER
MATERIAL
INSERTED
DIRECTION
Insert the filter so that surface of the fil-
ter hole turn toward the engine.
6. Replace the engine oil filter ⑦with a new
one.
When installing the engine oil filter, the
“HYOSUNG” character and
“16510HN910” part’s NO. must be
installed toward the outside, otherwise
the engine may be damaged.
7. Before replacing the engine oil filter cap ⑥,
be sure to check that the engine oil filter
spring ④and the
“
O
”
ring ⑤are installed
correctly. Use new
“
O
”
ring each time the
engine oil filter is replaced.
8. Replace the oil filter cap ⑥and tighten the
nuts securely but do not over tighten them.
Engine oil and exhaust pipes can be hot
enough to burn you.
Wait until the oil drain plug and exhaust
pipes are cool enough to touch with
bare hands before draining oil.
New and used oil can be hazardous.
Children and pets may be harmed by
swallowing new or used engine oil or
solvent. Continuous contact with used
engine oil has been found to cause skin
cancer in laboratory animals. Brief con-
tact with used oil or solvent may irritate
skin.
●Keep new and used oil and solvent
away from children and pets.
●Wear a long-sleeve shirt and water-
proof gloves.
●Wash with soap if oil or solvent con-
tact your skin.
❸
❸
❸
❻
❹
❸
❼
❺
❻
❸

CAUTION
CAUTION
CAUTION
CAUTION
41
9. Replace the drain plug
②
and tighten it
securely. At this time, insert the gasket
necessarily.
10. Pour fresh oil through the filler hole.
Approximately 3,200 ㎖of the engine oil
will be required.
Approximately 3,000 ㎖
㎖
㎖
㎖
㎖of the engine oil
must be required when changing the
engine oil only without replacing the oil
filter.
In case of the engine oil being over filled,
the engine output will be reduced.
Be careful not to over fill the engine oil.
11. Install the engine oil filler plug
①
.
Failure to use the correct oil can damage
your motorcycle.
Engine damage may occur if you use the
engine oil that does not meet Hyosung’s
specifications.
Be sure to use the engine oil specified in
the FUEL, ENGINE OIL AND ENGINE
COOLANT RECOMMENDATION section.
13. Check the oil level according to Engine
Oil Level Check procedure.
12. Start the engine and allow it idle for a
few minutes. Check to see that no the
engine oil is leaking from the engine oil
filter cap
⑥
and drain plug
②
.
Engine oil leaks from around the oil filter
cap or drain plug indicate incorrect
installation or “O” ring / gasket damage.
If you find any leaks or are not sure that
the oil filter cap / drain plug has been
properly installed, have the motorcycle
inspected by your Hyosung dealer or
qualified mechanic.

N O T E
WARNING
CAUTION
CAUTION
WARNING
42
Never top up beyond the “F” line or
coolant will leak out when the engine
is running.
ENGINE COOLANT
⊙
⊙
⊙
⊙
⊙COOLANT LEVEL
The coolant should be kept between the
“F”(FULL) and “L”(LOW) level lines in the
reservoir tank at all times. Inspect the level
every time before riding while the motorcy-
cle vertically. If the coolant is found lower
than the “L” level line, add properly mixed
coolant in the following way :
If the reservoir tank is emptied, pour the
engine coolant to the reservoir tank and
radiator.
Remove the reservoir tank filler cap
and add properly mixed coolant through the
filler hole until it reaches the “F” line of the
reservoir tank.
Refer to the FUEL, ENGINE OIL AND
ENGINE COOLANT RECOMMENDATION
section (15 page).
Wait for the engine to cool down
before checking or topping up
coolant level.
If coolant level drops too quickly or
the reservoir tank is empty, check the
cooling circuit for leaks. Have the
repair carried out at an authorized
Hyosung dealer.
Engine coolant is harmful or fatal if
swallowed or inhaled.
Do not drink anti-freeze or coolant
solution. If swallowed, do induce
vomiting. Immediately contact a poi-
son control center or a physician.
Avoid inhaling mist or hot vapors ; if
inhaled, remove to fresh air.
If coolant gets in eyes, flush eyes with
water and seek medical attention.
Wash thoroughly after handling.
Solution can be poisonous to ani-
mals. Keep out of the reach of chil-
dren and aminals.
Adding only water will dilute the engine
coolant and reduce its effectiveness.
Add 50 : 50 mixture of engine coolant
and water.
❶

N O T E
WARNING
43
You can be injured by scalding fluid
or steam if you open the radiator cap
when the engine is hot.
After the engine cools, wrap a thick
cloth around cap and carefully
remove the cap by turning it a quarter
to allow pressure to escape and then
turn the cap all the way off.
⊙
⊙
⊙
⊙
⊙CHANGING THE COOLANT
Change the coolant every two years.
⊙
⊙
⊙
⊙
⊙OPEN THE RADIATOR CAP
Remove the right frame head cover ①to
operate the radiator cap ③.
To disassemble the right frame head
cover ①, remove the two mounting bolts
②.
About 1.6
ℓ
ℓ
ℓ
ℓ
ℓ
of coolant will be required
when filling the radiator and reservoir
tank.
❶
❸
❷

CAUTION
CAUTION
CAUTION
WARNING
WARNING
44
When the ignition switch is set to “ON”
position with the engine stopped, the meter
lamp will come on and the needle of the
speedometer will turn once to the end as a
test of electric system operation.
Push the starter switch after the needle of
the speedometer turn back.
●Release the starter switch immediate-
ly after the motorcycle has started.
●Avoid pressing the starter switch
when the engine is running, or start-
ing motor damage.
●Do not engage the starting motor for
more than five seconds at a time as it
may overheat the wiring harness and
starting motor.
If the engine does not start after sev-
eral attempts, check the fuel supply
and igintion system.
(Refer for Page 79)
1. Inspect every day once before riding
the motorcycle.
2. The transmission is in neutral.
3. The ignition switch is in the “ON” posi-
tion.
4. The engine stop switch is in the
“ ” position.
5. Moving the side stand to the fully
upper position.
6. Squeeze the clutch lever.
RIDING TIPS
STARTING THE ENGINE
Necessary attempt
before start the engine :
is equipped
with the side stand ignition interlock
system.
If the transmission is in neutral or side
stand up, you can only start the engine
by pulling in the clutch lever.
This side stand ignition interlock system
prevents the motorcycle from being
started with side stand down.
Make sure that the side stand ignition
interlock system is working properly
before riding.
The head lamp, position lamp, meter
lamp, tail lamp and license plate lamp on
this motorcycle always comes on when
the ignition switch is turned to the “ON”
position.
Running the engine indoors or in a
garage can be hazardous.
Exhaust gas contains carbon monoxide,
a gas that is colorless and odorless and
can cause death or severe injury.
Only run the engine outdoors where
there is a fresh air.
Running the engine too long without rid-
ing may cause the engine to overheat.
Overheating can result in damage to
internal engine components and discol-
oration of exhaust pipes.
Shut the engine off if you do not begin
your ride promptly.

CAUTION CAUTION
CAUTION
WARNING
WARNING
WARNING
45
STARTING OFF
Riding these motorcycles at excessive
speed increase your chances of losing
control of the motorcycle.
This may result in an accident.
Always ride within the limits of your
skills, your motorcycle, and the riding
conditions.
Removing your hands from the handle-
bars or feet from the footrests during
operation can be hazardous. If you
remove even one hand or foot from the
motorcycle, you can reduce your ability
to control the motorcycle.
Always keep both hands on the handle-
bars and both feet on the footrests of
your motorcycle during operation.
Sudden side winds, which can occur
when being passed by large vehicles, at
tunnel exits or in hilly areas, can upset
your control.
Reduce your speed and be alert to side
winds.
Riding the motorcycle with the “FI”
check lamp ①
①
①
①
①lit can damage the engine
and transmission.
Whenever the “FI” check lamp ①
①
①
①
①is lit,
have your authorized Hyosung dealer or a
qualified mechanic inspect the electric
fuel injection system as soon as possible.
If the “FI” check lamp ①
①
①
①
①does not come
on when the ignition switch is set to
“ON” position with the engine stopped
or fail to go out after the engine start,
contact an authorized Hyosung dealer.
In case of , do
not attempt the start the engine until the
needle of the speedometer completes a
full sweep and returns to the rest posi-
tion otherwise the engine will start
badly.
If the engine does not start or runs
badly, turn the ignition switch to the
“OFF” position. After 8 seconds, turn
the ignition switch on, allow the
speedometer needle to complete it’s
sweep and return to the rest position
and then attempt to restart. This allows
the ISC (Idling Speed Control) solenoid
to be initialized.
❶

WARNING
WARNING
WARNING
WARNING
WARNING
46
Squeeze the clutch lever and pause
momentarily. Engage first gear by depress-
ing the gearshift lever downward.
Turn the throttle grip toward you and at
the same time release the clutch lever gen-
tly and smoothly. As the clutch engages,
the motorcycle will start moving forward.
To shift to the next higher gear, acceler-
ate gently, then close the throttle and
squeeze the clutch lever simultaneously.
Lift the gearshift lever upward to select the
next gear and release the clutch lever and
open the throttle again.
Select the gears in this manner until fifth
gear is reached.
Downshifting while the motorcycle is
leaned over in a corner may cause rear
wheel skid and loss of control.
Reduce your speed and downshift
before entering corner.
Do not turn the ignition switch to its
“OFF” position or the steering lock to
lock or the engine stop switch to its
“ ” position whilst riding the motorcy-
cle.
The transmission is provided to keep the
engine operating smoothly in its normal
operating speed range. The gear ratios
have been carefully chosen to meet the
characteristics of the engine. The rider
should always select the most suitable gear
for the prevailing conditions.
USING THE TRANSMISSION
Downshifting when engine speed is too
high can ;
●cause the rear wheel to skid and lose
traction due to increased engine
braking, resulting in an accident ; or
●force the engine to overrev in the
lower gear, resulting in engine dam-
age.
Opening the throttle suddenly can be
hazardous.
The front wheel can lift off the ground
and cause loss of control of the motor-
cycle.
Always open the throttle gradually when
you accelerate.
Shifting incorrectly can be hazardous.
Engine and drive belt damage can occur
if you do not shift correctly.
Slow down before downshifting and
always release the throttle every time
you shift gears.

WARNING WARNING
WARNING
WARNING
47
When climbing steep hills, the motorcycle
may begin to slow down and show lack of
power. At this point, you should shift to a
lower gear so that the engine will again be
operating in its normal power range. Shift
gear rapidly to prevent the motorcycle from
losing momentum.
When riding down a steep hill, the engine
may be used for braking by shifting to a
lower gear.
Be careful, however, not to allow the
engine to overrev.
RIDING ON HILLS STOPPING AND PARKING
1. Turn the throttle grip away from you to
close the throttle completely.
2. Apply the front and rear brakes evenly at
the same time.
3. Downshift through the gears as road
speed decreases.
4. Select neutral with the clutch lever
squeezed towards the grip (disengaged
position) just before the motorcycle
stops. Neutral position can be confirmed
by observing the neutral indicator lamp.
Inexperienced riders tend to underutilize
the front brake. This can cause exces-
sive stopping distance and lead to a col-
lision. Using only the front or rear brake
can cause skidding and loss of control.
Apply both brakes evenly at the same
time.
Hard braking on wet, loose, rough, or
other slippery surfaces can cause wheel
skid and loss of control.
Brake lightly and carefully on slippery or
irregular surfaces.
Hard braking while turning may cause
wheel skid and loss of control.
Brake before you begin to turn.
Operating motorcycles on steep hills
can be hazardous.
Never operate these motorcycles on
steep hills.

WARNING
WARNING
48
5. Park the motorcycle on a firm, flat sur-
face where it will not fall over.
Following another vehicle too closely
can lead to a collision. As vehicle
speeds increase, stopping distance
increases progressively.
Be sure you have a safe stopping dis-
tance between you and the vehicle in
front of you.
A hot muffler can burn you. The muffler
will be hot enough to burn you for some
time after stopping the engine.
Park the motorcycle where pedestrians
or children are not likely to touch the
muffler.
6. Turn the ignition switch to the “OFF”
position and remove the ignition key.
7. Turn the handlebar all the way to the left.
8. Insert the ignition key into the steering
lock, and turn it clockwise from the “
●
”
position.
9. Remove the ignition key.
This section explains how important prop-
er break-in is to achieve maximum life and
performance from your new Hyosung. The
following guidelines explain proper break-in
procedures.
Less than 3/4 throttle
Less than 1/2 throttle
Up to 1,600 km (1,000 miles)
Initial 800 km (500 miles)
★
★
★
★
★MAXIMUM THROTTLE OPENING
RECOMMENDATIONS
The table below shows the maximum
throttle opening recommendation during the
break-in period.
★
★
★
★
★AVOID CONSTANT LOW SPEED
Operating the engine at constant low
speed(light load) can cause parts to glaze
and not seat in. Allow the engine to acceler-
ate freely through the gears, without
exceeding the recommended maximum
limits. Do not, however, use full throttle for
the first 1,600 km (1,000 miles).
★
★
★
★
★VARY THE ENGINE SPEED
The engine speed should be varied and
not held at a constant speed.
This allows the parts to be “loaded” with
pressure and then unloaded, allowing the
parts to cool.
This aids the mating process of the parts.
It is essential that some stress be placed on
the engine components during break-in to
ensure this mating process.
Do not, though, apply excessive load on
the engine.
BREAK-IN

CAUTION
CAUTION
WARNING
49
Service should may be peformed before
1,000 km (600 miles) on motorcycle that
are used under severe conditions.
The 1,000 km (600 miles) service should
be performed as outlined in the INSPEC-
TION AND MAINTENANCE section of
this Owner’s Manual. Pay particular
attention to the
『
『
『
『
『CAUTION』
』
』
』
』
and
『
『
『
『
『WARN-
ING』
』
』
』
』
in that section.
Timely performance of the 1,000 km
(600 miles) service will ensure optimum
service life and performance from the
engine.
★
★
★
★
★BREAKING IN THE NEW TIRES
New tires need proper break-in to assure
maximum pe r f or m ance , just as the
engine does.
Wear in the tread surface by gradually
increasing your cornering lean angles
over the first 160 km (100 miles) before
attempting maximum performance. Avoid
hard acceleration, hard cornering, and hard
braking for the first 160 km (100 miles).
★
★
★
★
★ALLOW THE ENGINE OIL TO
CIRCULATE BEFORE RIDING
Allow sufficient idling time after warm
or cold engine start up before applying
load or revving the engine. This allows
time for the lubricating oil to reach all
critical engine components.
★
★
★
★
★OBSERVE YOUR FIRST, AND
MOST IMPORTANT 1,000 km
SERVICE
The 1,000 km (600 miles) service is the
most important service your motorcycle
will receive.
During break-in procedures, all of the
engine components will have worn in
and all of the other parts will have seated
in.
All adjustments will be restored, all fas-
teners will be tightened, and the dirty
engine oil and engine oil filter will be
replaced.
Failure to perform break-in of the tires
could cause tire slip and loss of control.
Use extra care when riding on new tire.
Perform proper break-in of the tire as
described in this section and avoid hard
acceleration, hard cornering, and hard
braking for the first 160 km (100 miles).

WARNING
WARNING
WARNING
WARNING
50
INSPECTION BEFORE
RIDING
Failure to inspect the motorcycle before
operating it can be hazardous.
Failure to perform proper maintenance
can also be hazardous.
Failure to inspect and maintain your
motorcycle increases the chances of an
accident or equipment damage.
Always inspect your motorcycle each
time you use it to make sure it is in safe
operating condition. Refer to the
INSPECTION AND MAINTENANCE sec-
tion in this owner’s manual.
Operating these motorcycles with
improper tires, or with improper or
uneven tire pressure can be hazardous.
If you use improper tires or improper or
uneven tire pressure, you may lose con-
trol of the motorcycle.
This will increase your risk of an acci-
dent.
Always use the size and type tires speci-
fied in this owner’s manual.
Always maintain proper tire pressure as
described in the INSPECTION AND
MAINTENANCE section.
Operating these motorcycles with
improper modifications can be haz-
ardous.
Improper installation of accessories or
modification of these motorcycles may
cause changes in handling. In some situ-
ations, this could lead to an accident.
Never modify these motorcycles
through improper installation or use of
accessories.
Overloading these motorcycles or carry-
ing or towing cargo improperly can be
hazardous.
Overloading or improper towing could
cause changes in motorcycle handling
which could lead to an accident.
Never exceed the stated load capacity
for these motorcycles.
Check the condition of the motorcycle to
help make sure that you do not have
mechanical problems, or you might get
stranded somewhere when you ride. Before
riding the motorcycle, be sure to check the
following items. Be sure your motorcycle is
in good condition for the personal safety of
the rider and protection of the motorcycle.

N O T E
CAUTION
WARNING
WARNING
52
The chart indicates the intervals between
periodic service in kilometers.
At the end of each interval, be sure to
inspect, check, lubricate and service as
instructed.
If your motorcycle is used under high
stress conditions such as continuous full
throttle operation, or is operated in a dusty
climate, certain services should be per-
formed more often to ensure reliability of the
machine as explained in the maintenance
section.
Your Hyosung dealer can provide you
with further guide lines.
Steering components and suspension
requires very special and careful servicing.
For maximum safety we suggest that you
have these items inspected and serviced by
your authorized dealer or a quali-Hyosung
fied service mechanic.
PERIODIC MAINTENANCE
Improper maintenance or failure to per-
form recommended maintenance
increases the chance of an accident or
motorcycle damage.
Always follow the inspection and main-
tenance recommendations and sched-
ules in this owner’s manual.
Ask your Hyosung dealer or a qualified
mechanic to do the maintenance items
marked with a pentagram (★
★
★
★
★).
You may perform the unmarked mainte-
nance items by referring to the instruc-
tions in this section, if you have
mechanical experience.
If you are not sure how to do any of the
jobs, have your Hyosung dealer or a
qualified mechanic do them.
Using poor quality replacement parts
can cause your motorcycle to wear
more quickly and may shorten its useful
life.
Use only genuine Hyosung replacement
parts or their equivalent.
Running the engine indoors or in a
garage can be hazardous.
Exhaust gas contains carbon monoxide,
a gas that is colorless and odorless and
can cause death or severe injury.
Only run the engine outdoors where
there is fresh air.
The MAINTENANCE CHART specifies
the minimun requirements for mainte-
nance. If you use your motorcycle under
severe conditions, perform maintenance
more often than shown in the chart. If
you have any questions regarding main-
tenance intervals, consult your Hyosung
dealer or a qualified mechanic.

CAUTION
53
⊙
⊙
⊙
⊙
⊙LUBRICATION POINTS
Proper lubrication is important for smooth and long life of each working part of your motor-
cycle and also for safe riding. It is a good practice to lubricate the motorcycle after a long
rough ride or after it gets wet in the rain or after washing it.
Major lubrication points are indicated as follows.
Lubricating switches can damage the switches.
Do not apply grease and oil to the switches.

54
①
Clutch lever holder and clutch cable
②
Passenger footrests pivot
③
Side stand pivot and spring hook
④
Footrests pivot
⑤
Speedo sensor
⑥
Front brake lever holder
⑦
Throttle cable
⑧
Rear brake pedal pivot
- - Motor oil, Grease
❶
❺❷
❸
❹
❷
❻
❼
❽
❹

55
Every
6,000 km
Every
12,000 km
Interval
Item
Clean every 3,000 km Replace every 12,000 km·
Tighten Tighten ─
Inspect Inspect ─
Tighten Tighten ─
Clean Clean Replace
Inspect Inspect ─
Replace every 4 years
Replace Replace ─
Replace Replace ─
Inspect Inspect ─
Inspect Inspect ─
Inspect Inspect ─
Replace every 2 years
─ ─Inspect
Replace every 4 years
⊙ENGINE
Air cleaner element
Exhaust pipe bolts and muffler mounting bolts
★
Valve clearance adjust ★
Cylinder head bolt ★
Spark plug
Fuel hose
Engine oil
Engine oil filter
Throttle cable
Idle speed ★
Clutch ★
Engine coolant ★
Radiator hose ★
First
1,000 km
Every
6,000 km
Interval
Item
Inspect every 1,000 km
Inspect Inspect ─
Inspect Inspect ─
Replace every 4 years
Inspect Inspect ─
Replace every 2 years
Inspect Inspect ─
Inspect Inspect ─
─ ─Inspect
─ ─Inspect
Tighten Tighten ─
Lubricate Lubricate ─
⊙CHASSIS
Drive belt
★
Brake
★
Tire
Steering
★
Front forks
★
Rear shock absorber
★
Chassis nuts and bolts
★
General lubrication
First
1,000 km
Every
12,000 km
Brake hose
★
Brake fluid
★
N O T E
“★”
: Ask your Hyosung dealer or qualified mechanic to do the maintenance items marked.

56
NO. NAME
Tool bag
10 ×12 mm open end spanner
14 ×17 mm open end spanner
Spark plug wrench
Combination screw driver
Screw driver handle
Pliers
Hexagon wrench 4 mm
Hexagon wrench 6 mm
1
2
3
4
5
6
7
8
9
Check if there is leakage from crankcase.
Check if there is leakage from fuel tank,
fuel pump, hose, fuel injection system.
To assist you in the performance of peri-
odic maintenance, a tool kit is supplied and
is located under the front seat.
The tool kit consists of the following items.
INSPECTION AND
MAINTENANCE
TOOL
ENGINE OIL
GASOLINE
❶
❷
❸
❹
❺
❻
❼
❽
❾
Inspect the fuel hose for damage and fuel
leakage. If any defect are found the fuel
hose must be replaced.
Replace the fuel hose every 4 years.
FUEL HOSE

WARNING
CAUTION
58
●Do not remove airtight cover as it is a
permanently sealed type battery.
●Keep separate from the motorcycle if
not used for a long time to reduce
electric discharge and electric leak-
age.
●Remove the negative terminal
when storing the motorcycle.
Never invert the battery cables.
Ensure that the ignition switch is in posi-
tion “OFF” before connecting or discon-
necting the battery, otherwise some
components might damage.
⊙
INSPECTION OF BATTERY
SOLUTION LEVEL
The battery is located under the front seat.
MF (Maintenance Free) battery of airtight
type is used for these motorcycles.
It is not necessary to inspect or supple-
ment battery fluid.
However, have your dealer check the
charging condition of battery periodically.
BATTERY
⊙
⊙
⊙
⊙
⊙CHECK AND CLEAN OF
BATTERY TERMINAL
Clean the battery terminal when it is dusty
or rusted.
1. Set the ignition switch “OFF” position.
2. Remove the front seat.
3. Check that battery lead wire and termi-
nal.
4. If necessary : disconnect the negative
battery wire first, then disconnect the
positive battery wire.
Remove the battery.
5. Clean the terminal.
If there is white dust, clean it with warm
water.
6. Connect the battery wires and grease
the terminal lightly.
When reinstalling the battery, be sure to
connect the positive battery wire first,
then connect the negative battery
wire.

CAUTION
CAUTION
CAUTION
59
●
●
●
●
●Keep the battery away from fires.
●
●
●
●
●When disconnecting the battery wire,
be sure to remove the negative
battery wire first with the ignition
switch “OFF” position, then remove
the positive
battery wire.
When reinstalling the battery, be sure
to connect the positive
battery
wire first, then connect the negative
battery wire.
●
●
●
●
●Ensure the battery wires are fastened
tightly.
●
●
●
●
●Incorrect installation of the battery
will reverse the terminal position
resulting in possible electrical sys-
tem damage due to incorrect battery
lead connection.
The red lead wire must go to the pos-
itive
terminal and the black (or
black with white tracer) lead wire
must go to the negative
terminal.
●
●
●
●
●Never charge a battery while still in
the machine as damage may result
to the battery or regulator / rectifier.
The air cleaner is located inside the air
cleaner cover on the right side of the motor-
cycle.
If the air cleaner element has become
clogged with dust, intake resistance will
increase with a resultant decrease in power
output and an increase in fuel consumption.
If riding under severe conditions must be
cleaned or replaced more frequently than
maintenance schedule. Check and clean
the air cleaner element periodically accord-
ing to the following procedure.
AIR CLEANER
If the air cleaner element is polluted it
will result in starting difficulty, engine
output reduced, combustion efficiency
decline, and sooty smoke (black
smoke). Inspect and clean the air clean-
er element and confirm.
Never operate the engine without the
element in position.
Operating the engine without the air
cleaner element will increase engine
wear. Always be sure that the air cleaner
element is in excellent operational con-
dition.
The life of the engine depends largely on
this single component.
Product Specifications
| Brand: | Hyosung |
| Category: | Motor |
| Model: | Aquila Classic GV700C |
Do you need help?
If you need help with Hyosung Aquila Classic GV700C, ask a question below and other users will answer you
Motor Hyosung User Manuals

15 October 2024
15 October 2024
15 October 2024
15 October 2024
15 October 2024
Motor User Manuals
- Motor Yamaha
- Motor Anova
- Motor Suzuki
- Motor BodyCraft
- Motor Sherco
- Motor Honda
- Motor TVS
- Motor Indian
- Motor GasGas
- Motor Triumph
- Motor Reebok
Latest Motor User Manuals
24 October 2024
24 October 2024
24 October 2024
21 October 2024
19 October 2024
17 October 2024
17 October 2024
15 October 2024
15 October 2024
15 October 2024