Canon CLC2620 Manual
Read below 📖 the manual in Italian for Canon CLC2620 (58 pages) in the Printer category. This guide has been helpful for 16 people and has been rated 4.5 stars on average by 2 users
Page 1/58
User's Guide
Please read this guide before operating this product.
After you finish reading this guide, store it in a safe place for future reference. ENG
Color Network ScanGear


Color Network ScanGear
User's Guide


How This Manual Is Organized
Before Using Color Network ScanGear
Installation
Before Scanning
Scanning
Appendix
Includes the index.
Chapter 1
Chapter 2
Chapter 3
Chapter 4
Chapter 5
Considerable effort has been made to ensure that this manual is free of inaccuracies and omissions. However, as we are constantly improving our
products, if you need an exact specification, please contact Canon.

iv
Contents
Preface . . . . . . . . . . . . . . . . . . . . . . . . . . . . . . . . . . . . . . . . . . . . . . . . . . . . . . . . . vi
How to Use This Manual . . . . . . . . . . . . . . . . . . . . . . . . . . . . . . . . . . . . . . . . . . . vi
Symbols Used in This Manual . . . . . . . . . . . . . . . . . . . . . . . . . . . . . . . . . . . . . . vi
Keys and Buttons Used in This Manual . . . . . . . . . . . . . . . . . . . . . . . . . . . . . . . vi
Displays Used in This Manual . . . . . . . . . . . . . . . . . . . . . . . . . . . . . . . . . . . . . vii
Abbreviations Used in This Manual . . . . . . . . . . . . . . . . . . . . . . . . . . . . . . . . . viii
Legal Notices . . . . . . . . . . . . . . . . . . . . . . . . . . . . . . . . . . . . . . . . . . . . . . . . . . . . .ix
Trademarks. . . . . . . . . . . . . . . . . . . . . . . . . . . . . . . . . . . . . . . . . . . . . . . . . . . . . ix
Copyright . . . . . . . . . . . . . . . . . . . . . . . . . . . . . . . . . . . . . . . . . . . . . . . . . . . . . . ix
Disclaimers. . . . . . . . . . . . . . . . . . . . . . . . . . . . . . . . . . . . . . . . . . . . . . . . . . . . . x
Chapter 1 Before You Start
Introduction . . . . . . . . . . . . . . . . . . . . . . . . . . . . . . . . . . . . . . . . . . . . . . . . . . . . 1-2
System Environment Requirements . . . . . . . . . . . . . . . . . . . . . . . . . . . . . . . . 1-3
Where to Find Help . . . . . . . . . . . . . . . . . . . . . . . . . . . . . . . . . . . . . . . . . . . . . . 1-5
Chapter 2 Getting Started
Installing the Software. . . . . . . . . . . . . . . . . . . . . . . . . . . . . . . . . . . . . . . . . . . . 2-2
Uninstallation Procedure . . . . . . . . . . . . . . . . . . . . . . . . . . . . . . . . . . . . . . . . . 2-6
Chapter 3 Before Scanning
Switching the Scanner Online and Offline . . . . . . . . . . . . . . . . . . . . . . . . . . . 3-2
Switching the Scanner Online . . . . . . . . . . . . . . . . . . . . . . . . . . . . . . . . . . . . 3-2
Switching Offline . . . . . . . . . . . . . . . . . . . . . . . . . . . . . . . . . . . . . . . . . . . . . . 3-4
Switching Offline When Scanning is not in Progress . . . . . . . . . . . . . . . . 3-4
Switching Offline When Scanning is in Progress . . . . . . . . . . . . . . . . . . . 3-5
Selecting the Network Scanner to be Used. . . . . . . . . . . . . . . . . . . . . . . . . . . 3-6
Starting Color Network ScanGear . . . . . . . . . . . . . . . . . . . . . . . . . . . . . . . . . . 3-8
Color Network ScanGear Main Window . . . . . . . . . . . . . . . . . . . . . . . . . . . . . . 3-9
Toolbar . . . . . . . . . . . . . . . . . . . . . . . . . . . . . . . . . . . . . . . . . . . . . . . . . . . . . . 3-9
Scanning buttons . . . . . . . . . . . . . . . . . . . . . . . . . . . . . . . . . . . . . . . . . . . . . 3-10
Preview Area . . . . . . . . . . . . . . . . . . . . . . . . . . . . . . . . . . . . . . . . . . . . . . . . 3-11
Settings . . . . . . . . . . . . . . . . . . . . . . . . . . . . . . . . . . . . . . . . . . . . . . . . . . . . 3-11
Status Bar . . . . . . . . . . . . . . . . . . . . . . . . . . . . . . . . . . . . . . . . . . . . . . . . . . 3-12

v
Chapter 4 Scanning
Scanning from the Platen Glass . . . . . . . . . . . . . . . . . . . . . . . . . . . . . . . . . . . .4-2
Scanning from the Feeder . . . . . . . . . . . . . . . . . . . . . . . . . . . . . . . . . . . . . . . . .4-4
Scanning from the Feeder . . . . . . . . . . . . . . . . . . . . . . . . . . . . . . . . . . . . . . . . 4-4
Ensuring Scanned Originals are Correctly Oriented . . . . . . . . . . . . . . . . . . . .4-6
To Automatically Recognize the Orientation of the Original. . . . . . . . . . . .4-6
To Set the Feeding Direction of the Originals. . . . . . . . . . . . . . . . . . . . . . .4-6
Scanning Different Sized Originals Together . . . . . . . . . . . . . . . . . . . . . . . . . .4-7
For Defined Paper Sizes . . . . . . . . . . . . . . . . . . . . . . . . . . . . . . . . . . . . . .4-7
For Undefined Paper Sizes . . . . . . . . . . . . . . . . . . . . . . . . . . . . . . . . . . . .4-7
Specifying the Scanning Area . . . . . . . . . . . . . . . . . . . . . . . . . . . . . . . . . . . . . .4-8
Department ID Management . . . . . . . . . . . . . . . . . . . . . . . . . . . . . . . . . . . . . . .4-10
What Is Department ID Management? . . . . . . . . . . . . . . . . . . . . . . . . . . . . .4-10
Using Department ID Management when Scanning . . . . . . . . . . . . . . . . . . . 4-10
Preregistering a Department ID and Password . . . . . . . . . . . . . . . . . . . .4-10
Entering the Department ID and Password Each Time You Scan . . . . . .4-11
Summary of Important Features and Settings . . . . . . . . . . . . . . . . . . . . . . . .4-13
Basic Settings . . . . . . . . . . . . . . . . . . . . . . . . . . . . . . . . . . . . . . . . . . . . . . . . 4-13
Image Processing Settings . . . . . . . . . . . . . . . . . . . . . . . . . . . . . . . . . . . . . .4-13
Settings for Scanning from the Feeder . . . . . . . . . . . . . . . . . . . . . . . . . . . . . 4-14
Department ID Management Settings . . . . . . . . . . . . . . . . . . . . . . . . . . . . . . 4-14
Troubleshooting . . . . . . . . . . . . . . . . . . . . . . . . . . . . . . . . . . . . . . . . . . . . . . . 4-15
Chapter 5 Appendix
Index . . . . . . . . . . . . . . . . . . . . . . . . . . . . . . . . . . . . . . . . . . . . . . . . . . . . . . . . . . .5-2
vii
Displays Used in This Manual
Screen shots of computer operation screens used in this manual may differ from
the ones you actually see, depending on the operating system and the model or
options that come with your machine.
The keys or buttons which you should click or press are marked with , as
shown below.
When multiple keys or buttons can be clicked or pressed, they are highlighted and
mentioned in the order in which they should be clicked or pressed.
8
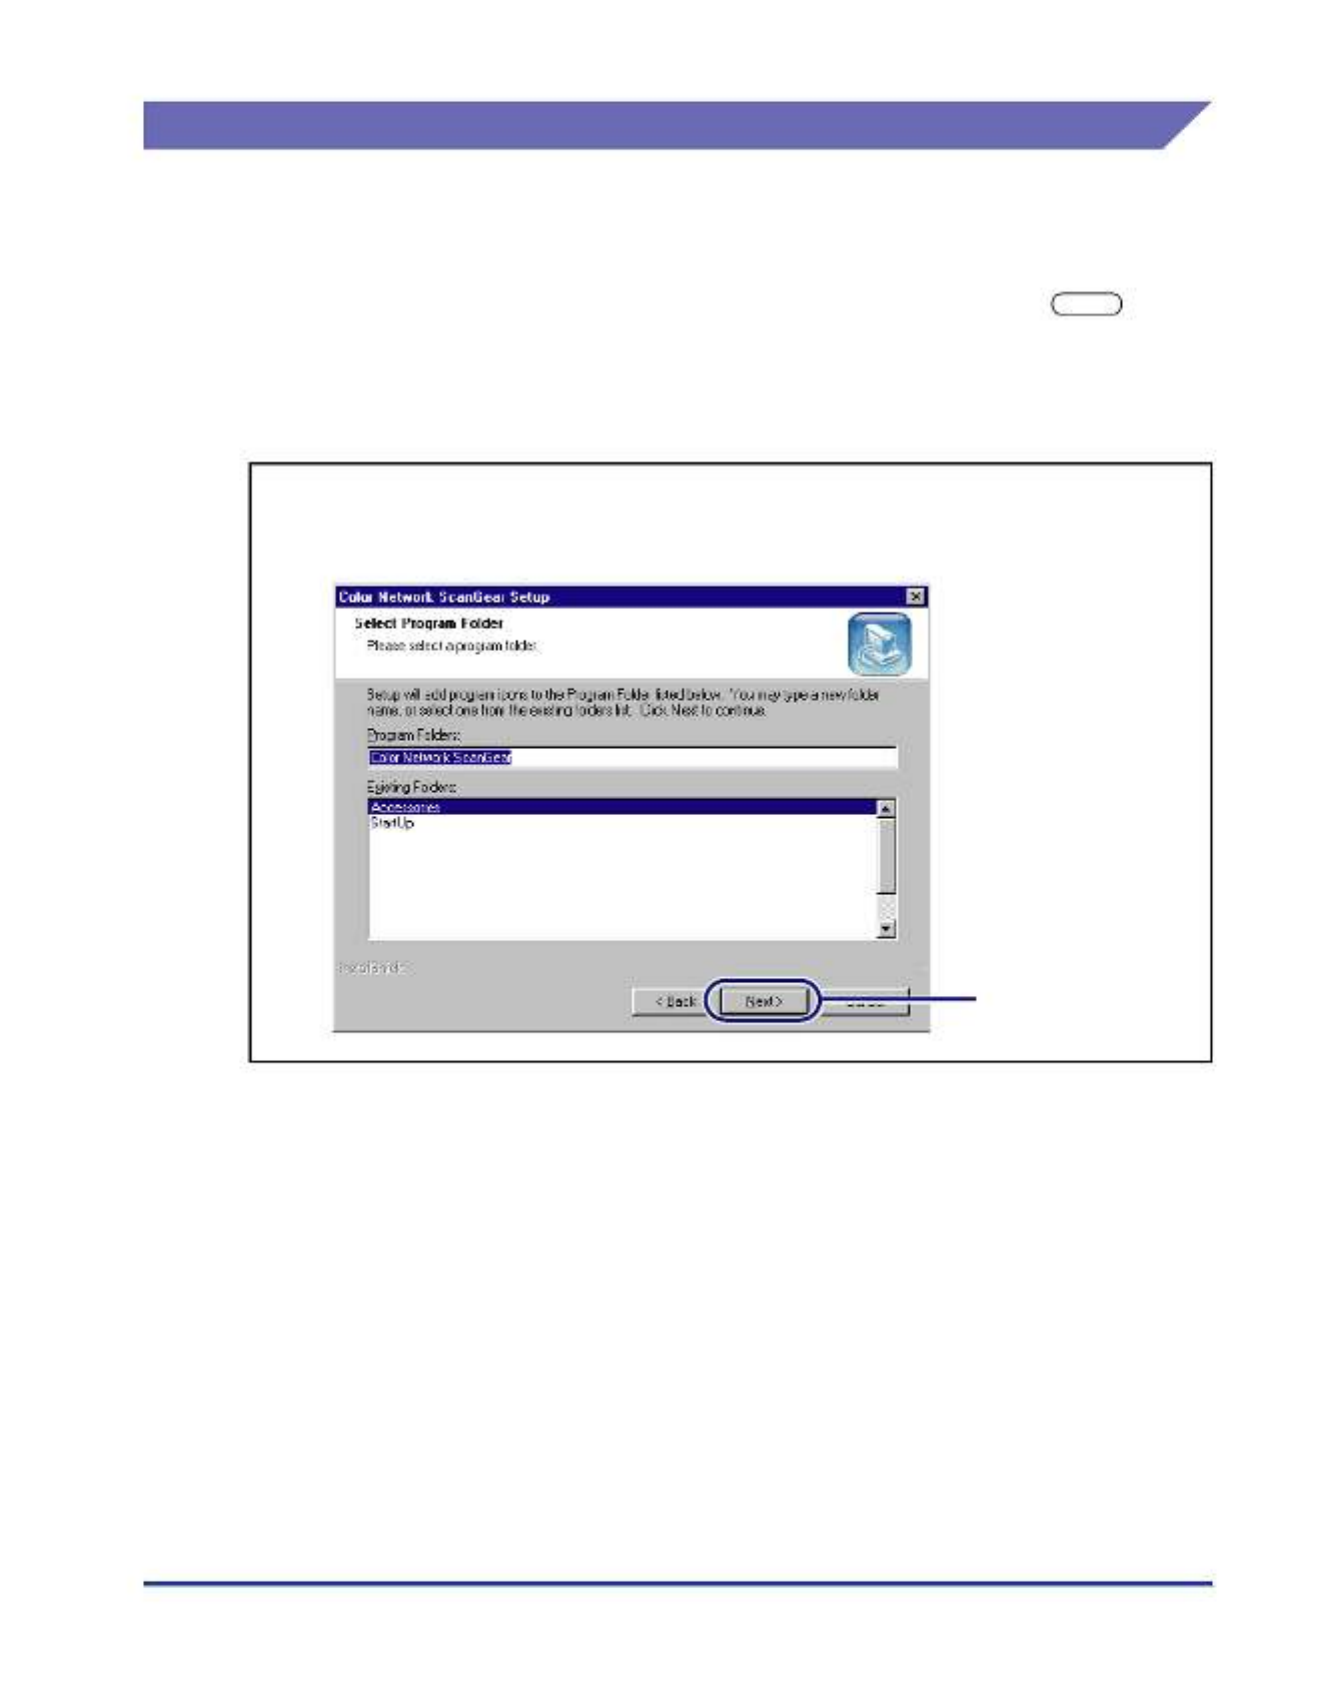
Specify the folder to which the Color Network ScanGear
program icon is to be added click [Next].➞
Click this button
for operation.

x
Disclaimers
The information in this document is subject to change without notice.
CANON INC. MAKES NO WARRANTY OF ANY KIND WITH REGARD TO THIS
MATERIAL, EITHER EXPRESS OR IMPLIED, EXCEPT AS PROVIDED HEREIN,
INCLUDING WITHOUT LIMITATION, THEREOF, WARRANTIES AS TO
MARKETABILITY, MERCHANTABILITY, FITNESS FOR A PARTICULAR
PURPOSE OF USE OR AGAINST INFRINGEMENT OF ANY PATENT. CANON
INC. SHALL NOT BE LIABLE FOR ANY DIRECT, INCIDENTAL, OR
CONSEQUENTIAL DAMAGES OF ANY NATURE, OR LOSSES OR EXPENSES
RESULTING FROM THE USE OF THIS MATERIAL.

CHAPTER
1-1
1
Before You Start
This chapter describes the system environments required for using Color Network ScanGear.
It also explains where to find help.
Introduction. . . . . . . . . . . . . . . . . . . . . . . . . . . . . . . . . . . . . . . . . . . . . . . . . . . . . . . . . . . . 1-2
System Environment Requirements . . . . . . . . . . . . . . . . . . . . . . . . . . . . . . . . . . . . . . . . . 1-3
Where to Find Help. . . . . . . . . . . . . . . . . . . . . . . . . . . . . . . . . . . . . . . . . . . . . . . . . . . . . . 1-5

Introduction
1-2
Before You Start
1
Introduction
Color Network ScanGear is a 32-bit TWAIN-compliant scanner driver that enables
computers on a network to use a Canon iR, imagePRESS, or MF series color
digital copier as a scanner.
It consists of the following software:
■ScanGear Tool
This software is installed together with the Network ScanGear driver, and enables the
user to select the device name of the scanner on the network to be used for scanning with
the Network ScanGear driver. No scanner is selected during Color Network ScanGear
installation, so you must start the ScanGear Tool and select a scanner before use.
■Network ScanGear driver
This is a scanner driver that can be accessed from TWAIN-compliant applications. This
driver is then used when scanning.

System Environment Requirements 1-3
Before You Start
1
System Environment Requirements
Color Network ScanGear requires the following system environment.
■Hardware:
•IBM PC/AT or compatible computer running Windows 98/Me/2000/XP/Server 2003/Vista
•Available hard disk space equal to at least twice the size of the scanned image (100 MB
or more recommended)
•Main memory must meet the following conditions:
For Windows 98/Me: at least 64 MB (96 MB or more recommended)
For Windows 2000: at least 96 MB (128 MB or more recommended)
For Windows XP: at least 128 MB (192 MB or more recommended)
For Windows Server 2003: at least 128 MB (256 MB or more recommended)
For Windows Vista: at least 512 MB (1 GB or more recommended)
•Monitor providing at least 640 x 480 dot display resolution (800 x 600 dot or greater
recommended), at least 256 colors
•A network host adapter providing TCP/IP and UDP/IP protocols over Ethernet or Token
Ring
•An iR, imagePRESS, or MF series color digital copier
NOTE
•
Color Network ScanGear does not support black-and-white iR series digital copiers.
•
You cannot use Color Network ScanGear with iR series color digital copiers equipped
with an optional USB interface board.
•
When scanning a large number of images or images that are very large, memory
shortage can result in errors or greatly reduced scanning speed. In this case, take one or
more of the following measures:
- Delete unnecessary files from the hard disk to release additional disk space, or
increase the hard disk capacity.
- Rescan at a lower resolution.
- Add more RAM.
- Set the virtual memory size to be as large as possible.

System Environment Requirements
1-4
Before You Start
1
■Software:
•OS
- Microsoft Windows 98
- Microsoft Windows Millennium Edition
- Microsoft Windows 2000
- Microsoft Windows XP
- Microsoft Windows Server 2003
- Microsoft Windows Vista
•Application
- TWAIN-compliant application
NOTE
Color Network ScanGear is not compatible with Mac OS.

Where to Find Help 1-5
Before You Start
1
Where to Find Help
■[Readme. txt] file
The [Readme.txt] file includes important notes on use of the product. Be sure to read it
before starting. The [Readme.txt] file is located in \Color_Network_ScanGear\driver\
english.
■Online Help
When using Color Network ScanGear, help is always available from the following sources.
Use them when you are unsure about how to do an operation.
•When the Network ScanGear driver is running, click [ ] (Help) in the toolbar to display
the Network ScanGear driver help.
•When the ScanGear Tool is running or the Network ScanGear driver settings dialog box
is displayed, click [Help] for help relating to the items in the dialog box.
■Canon Authorized Dealers or Service Providers
If the Online Help does not provide the information you need, contact your local
authorized Canon dealer.

Where to Find Help
1-6
Before You Start
1

Installing the Software
2-2
Getting Started
2
Installing the Software
This section describes instructions for installing the ScanGear Tool and the Network
ScanGear driver at the same time.
IMPORTANT
•
If you want to install the software under Windows 2000/XP/Server 2003, you must log on
as an Administrator.
•
If the [User Account Control] dialog box appears in Windows Vista, perform the following
operations.
- For Administrator users, click [Allow] or [Continue].
- For Standard users, enter the required Administrator password
➞
click [OK].
1
Start Windows.
2
Insert the Software CD-ROM into the CD-ROM drive wait for ➞
the installation process to start.
For Windows 98/Me/2000/XP/Server 2003:
If nothing happens, double-click the [My Computer] icon the CD-ROM drive ➞
icon the [MInst.exe] icon to start the installation process.➞
For Windows Vista:
If the [AutoPlay] dialog box appears, click [Run MInst.exe].
If Windows Explorer opens, double-click the [MInst.exe] icon.
If nothing happens, on the [ ] (Start) menu, click [Computer] double-click ➞
the CD-ROM drive icon.
If you cannot find the [MInst.exe] icon on your CD-ROM:
1. Double-click the following folders: [Color_Network_ScanGear] [driver] ➞ ➞
[english] [DISK1]. ➞
2. Double-click the [Setup.exe] icon to start the installation process proceed ➞
to step 5.
NOTE
Depending on the software or the operating system you are using, a screen for
selecting the language to be used for the installer may be displayed before
installing.
Installing the Software 2-3
Getting Started
2
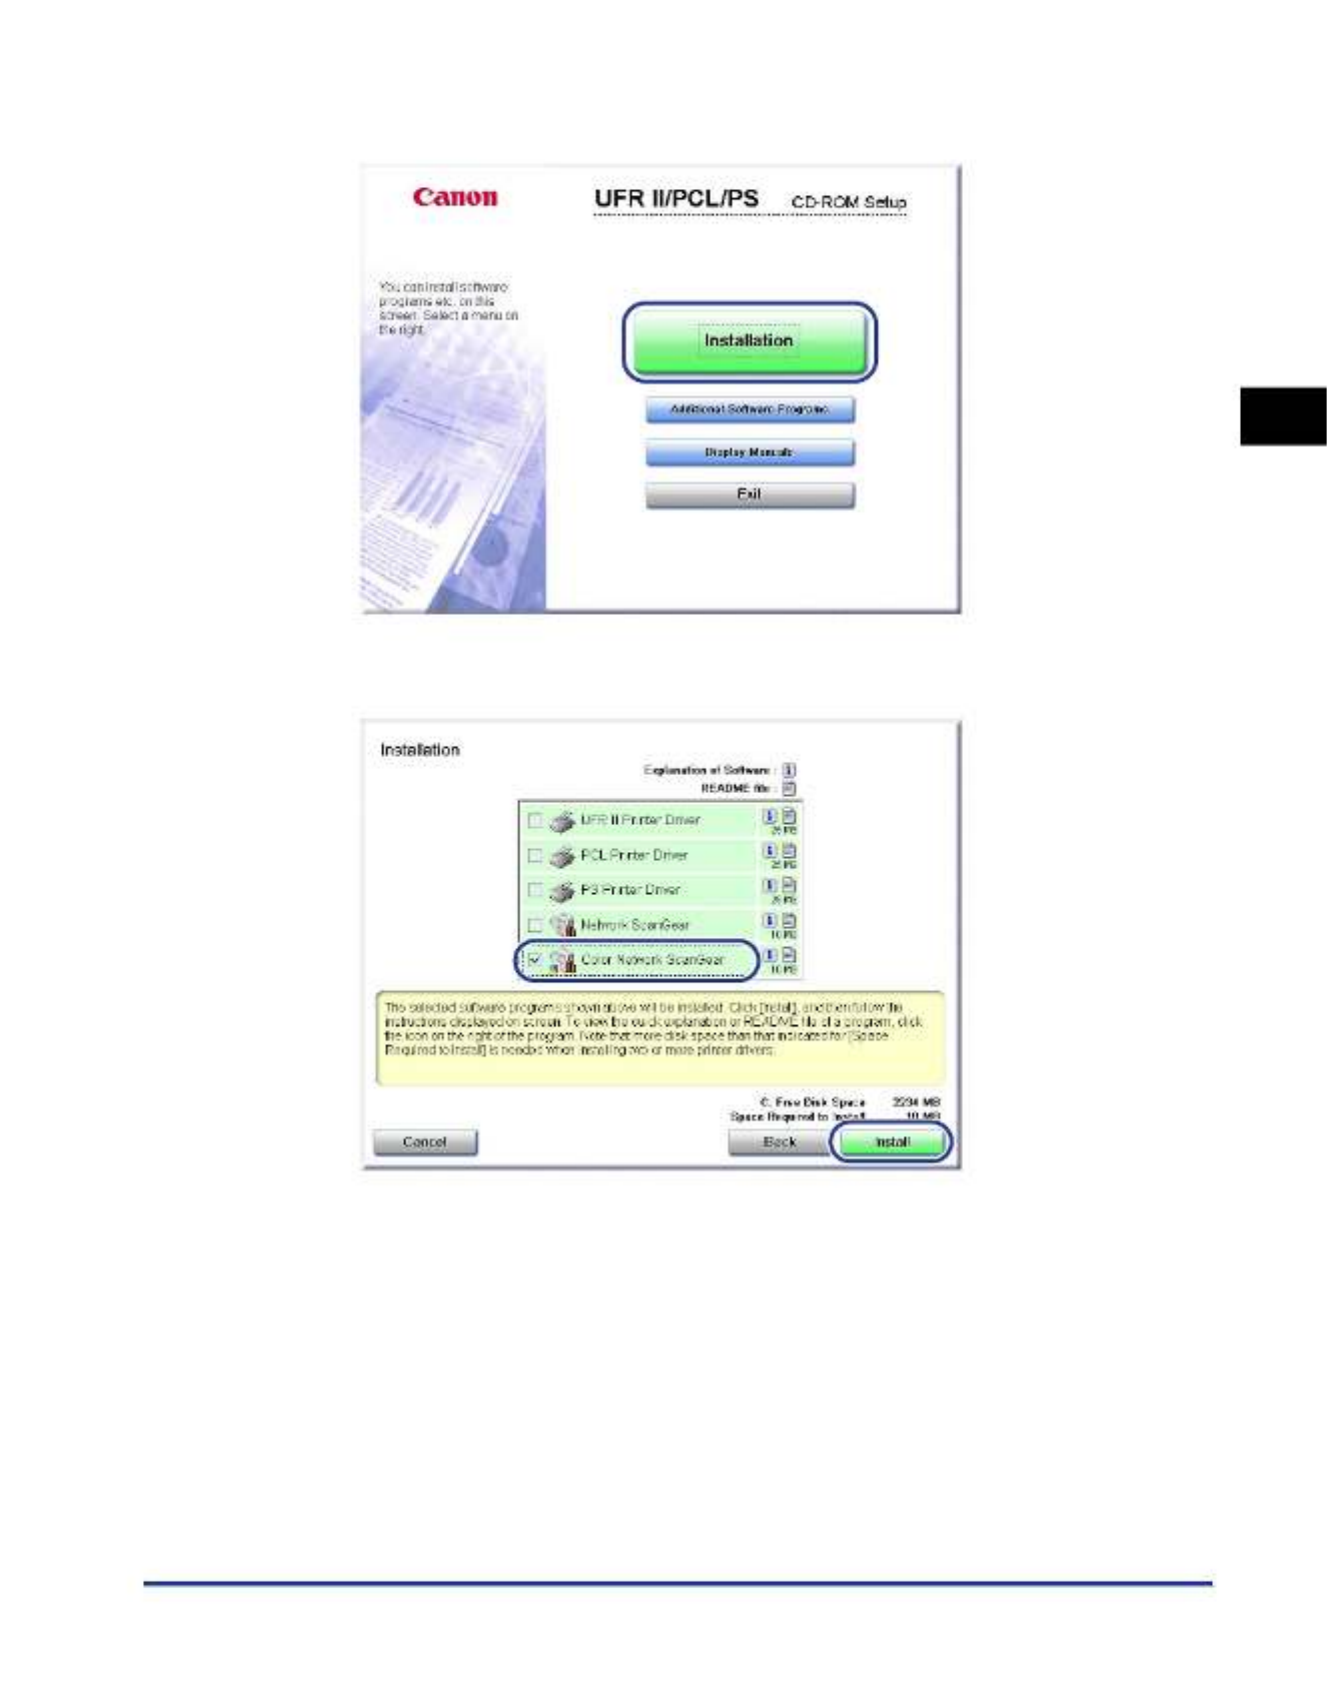
3
In the CD-ROM Setup screen, click [Installation].
4
Select Color Network ScanGear from the list click [Install].➞
5
In the Welcome screen, click [Next].
6
Read the license agreement carefully. If you agree to the
terms, click [Yes].

Installing the Software
2-4
Getting Started
2
7
In the Choose Destination Location screen, specify the
location where Color Network ScanGear is to be installed ➞
click [Next].
8
Specify the folder to which the Color Network ScanGear
program icon is to be added click [Next].➞
Installing the Software 2-5
Getting Started
2
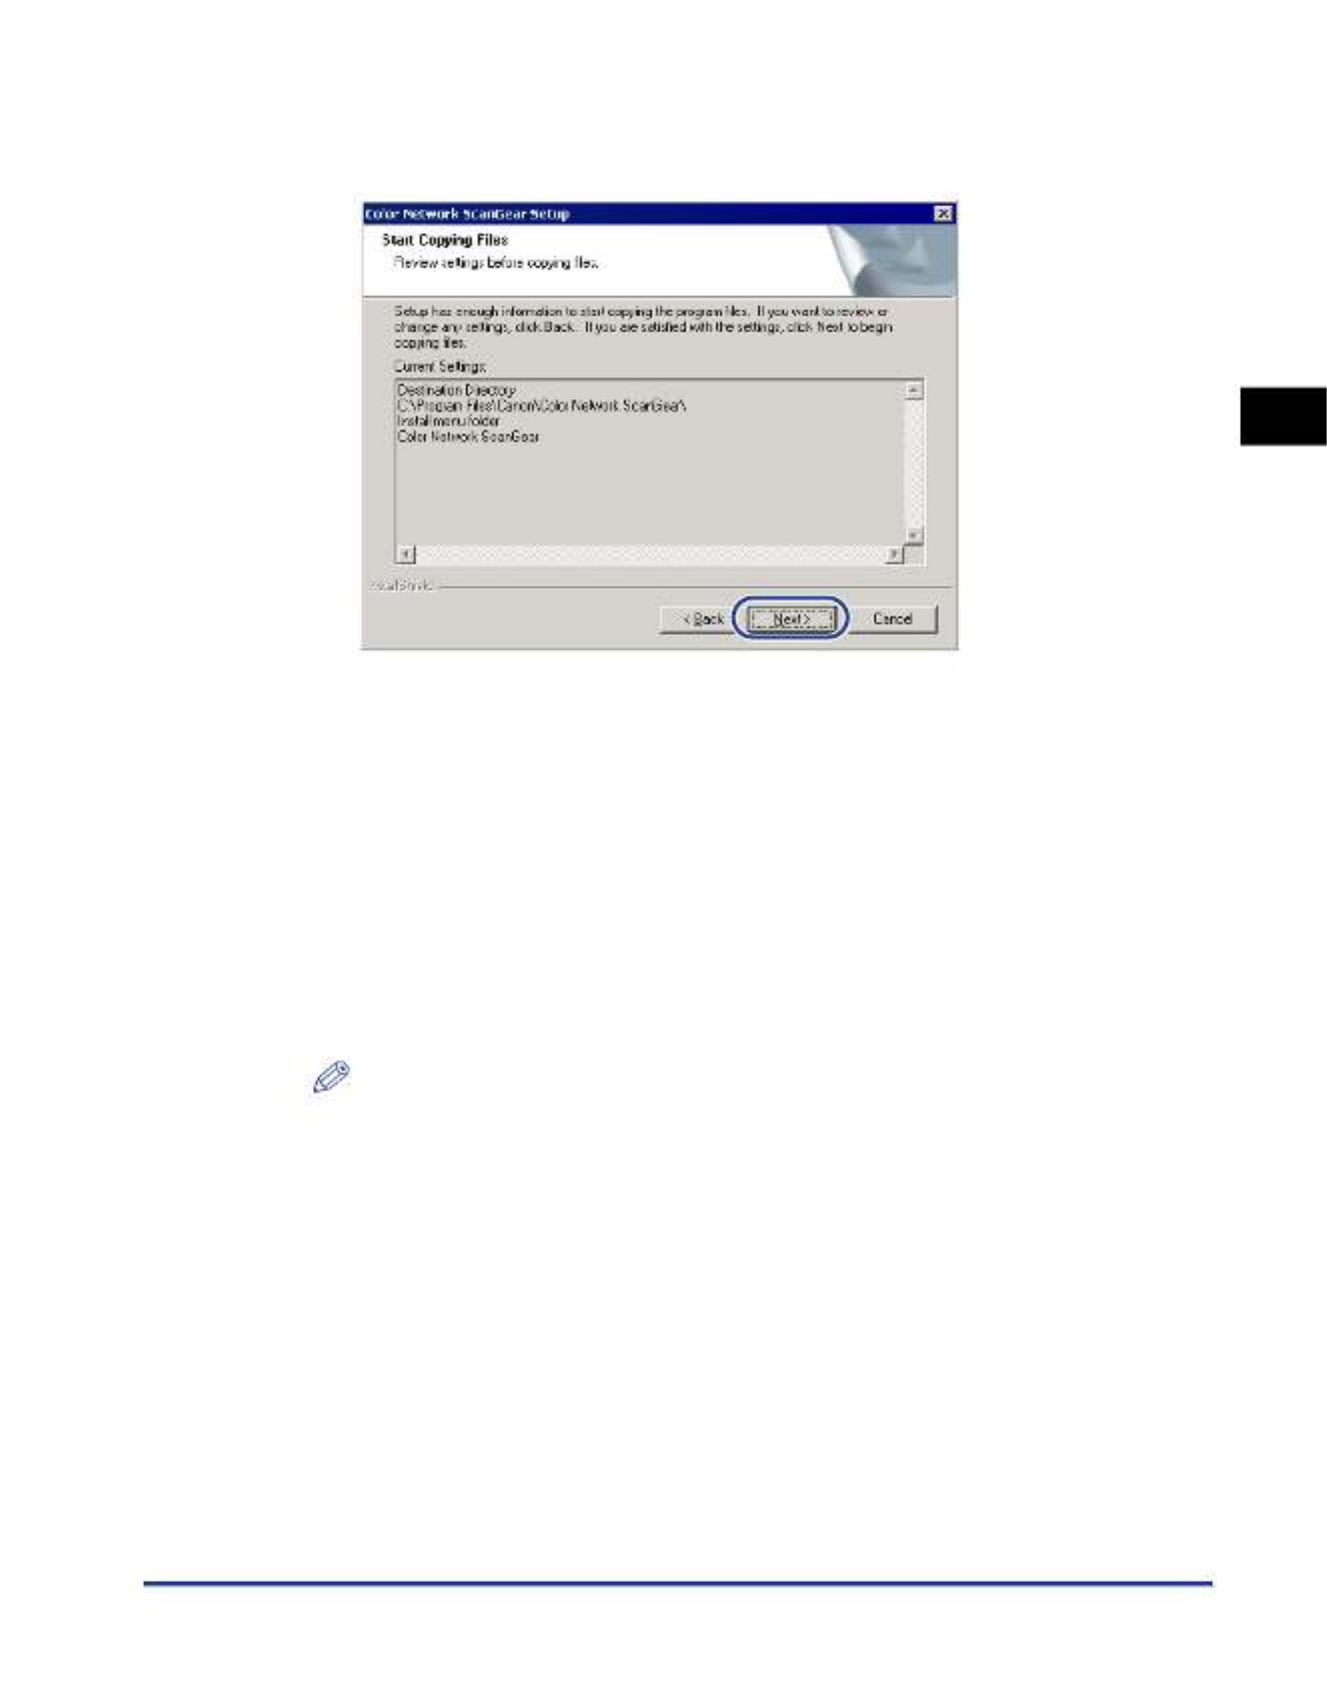
9
Check the settings in the Start Copying Files screen click ➞
[Next].
Installation starts, and the progress of installation is displayed.
When the necessary files have been copied, a dialog box appears to indicate that
installation is complete.
10
Click [Next].
11
Click [Exit] to finish the installation.
If you want to restart your computer, select [Restart Computer Now] ➞ click
[Restart].
NOTE
•
When installation is complete, before starting the Network ScanGear driver you
must use the ScanGear Tool in order to select the network scanner to be used for
scanning. For instructions on how to select the network scanner, see "Selecting the
Network Scanner to be Used," on p. 3-6.
•
The Network ScanGear driver does not operate independently. To scan, access
this driver from a TWAIN-compliant application.

CHAPTER
3-1
3
Before Scanning
This chapter describes preparations required to scan using Color Network ScanGear, the
procedure to start the Network ScanGear driver, and the Color Network ScanGear Main
Window.
Switching the Scanner Online and Offline . . . . . . . . . . . . . . . . . . . . . . . . . . . . . . . . . . . . 3-2
Switching the Scanner Online . . . . . . . . . . . . . . . . . . . . . . . . . . . . . . . . . . . . . . . . . . . . . . . . . . .3-2
Switching Offline. . . . . . . . . . . . . . . . . . . . . . . . . . . . . . . . . . . . . . . . . . . . . . . . . . . . . . . . . . . . . .3-4
Selecting the Network Scanner to be Used . . . . . . . . . . . . . . . . . . . . . . . . . . . . . . . . . . . 3-6
Starting Color Network ScanGear . . . . . . . . . . . . . . . . . . . . . . . . . . . . . . . . . . . . . . . . . . 3-8
Color Network ScanGear Main Window . . . . . . . . . . . . . . . . . . . . . . . . . . . . . . . . . . . . . . 3-9
Toolbar . . . . . . . . . . . . . . . . . . . . . . . . . . . . . . . . . . . . . . . . . . . . . . . . . . . . . . . . . . . . . . . . . . . . .3-9
Scanning buttons . . . . . . . . . . . . . . . . . . . . . . . . . . . . . . . . . . . . . . . . . . . . . . . . . . . . . . . . . . . .3-10
Preview Area . . . . . . . . . . . . . . . . . . . . . . . . . . . . . . . . . . . . . . . . . . . . . . . . . . . . . . . . . . . . . . .3-11
Settings. . . . . . . . . . . . . . . . . . . . . . . . . . . . . . . . . . . . . . . . . . . . . . . . . . . . . . . . . . . . . . . . . . . .3-11
Status Bar . . . . . . . . . . . . . . . . . . . . . . . . . . . . . . . . . . . . . . . . . . . . . . . . . . . . . . . . . . . . . . . . . .3-12

Switching the Scanner Online and Offline
3-2
Before Scanning
3
Switching the Scanner Online and Offline
To start the Network ScanGear driver and scan, first you must switch the scanner
online.
NOTE
•
In the following procedure, screen shots of the iR C3200's touch panel display are used;
the screen shots might differ depending on the copier model you are using.
•
If you are using the iR2018, iR2030/2025/2022, or MF series, see the Reference Guide
for details about switching between online and offline.
Switching the Scanner Online
Switching the scanner online enables communications with other devices on the
network, and allows the scanner to receive data from the computer.
Follow the procedure below to switch the scanner online.
1
On the touch panel display, press [Options].
NOTE
Depending on the scanner you are using, you may need to press [Remote
Scanner] after this in order to proceed to step 2.

Switching the Scanner Online and Offline 3-3
Before Scanning
3
2
Press [Online].
When the following display appears, the scanner is online.

Switching the Scanner Online and Offline
3-4
Before Scanning
3
Switching Offline
After scanning over the network, disconnect the scanner from the network by
switching it offline in order to use other functions. The procedure for switching the
scanner offline depends on whether or not scanning is in progress.
NOTE
You do not have to switch the scanner offline in order to use other functions while data is
being transferred.
Switching Offline When Scanning is not in Progress
1
Press [Offline].
When the following display appears, the scanner is offline.

Switching the Scanner Online and Offline 3-5
Before Scanning
3
Switching Offline When Scanning is in Progress
1
Press [Offline].
2
Press [Yes].
After a few seconds, scanning is interrupted and the following display appears,
indicating that the scanner is offline.
NOTE
Press [No] to cancel if you decide not to switch the scanner offline.

Selecting the Network Scanner to be Used
3-6
Before Scanning
3
Selecting the Network Scanner to be Used
Selecting the network scanner to be used with the ScanGear Tool enables scanning
with the Network ScanGear driver. No scanner is selected during the Color Network
ScanGear installation, so this operation is required before use.
IMPORTANT
The ScanGear Tool cannot be started at the same time as the Network ScanGear driver.
1
On the [Start] (or [ ]) menu, point to [Programs] (or [All
Programs]) [Color Network ScanGear] click [ScanGear ➞ ➞
Tool].
The ScanGear Tool starts.

Starting Color Network ScanGear
3-8
Before Scanning
3
Starting Color Network ScanGear
The Network ScanGear driver is started by accessing it from a TWAIN-compliant
application as follows.
IMPORTANT
•
If you are using Color Network ScanGear for the first time after installing it, the network
scanner to be used must be selected with the ScanGear Tool. For details, see "Selecting
the Network Scanner to be Used," on p. 3-6.
•
The Network ScanGear driver cannot be started at the same time as the ScanGear Tool.
If the ScanGear Tool is running, close it.
1
Switch the scanner online.
For details, see "Switching the Scanner Online and Offline," on p. 3-2.
2
Start the application.
3
In the application, select Color Network ScanGear as the
scanner to be used.
In the application, select the command for scanner selection (for example,
"Select Scanner", or "Select Source") select [Color Network ScanGear] in the ➞
dialog box that appears.
After performing this operation once, there is no need to repeat it.
4
In the application, select the command to start scanning
operation (for example, [Scan New] or [Acquire]).
The Color Network ScanGear Main Window appears.
NOTE
•
Individual items in this window are explained on the next page.
•
See the documentation provided with your application for commands and
procedures used to select Color Network ScanGear and start scanning.

Color Network ScanGear Main Window
3-10
Before Scanning
3
■[ ] (Zoom)
Clicking this button turns the pointer into a magnifying glass in the Preview Area, allowing
you to enlarge or reduce the image in the Preview Area. Click the left mouse button on the
preview image to enlarge it by one step, and click the right mouse button on the enlarged
image to reduce it by one step. This button is available only when an image appears in the
Preview Area.
■[ ] (Ruler)
Clicking this button displays rulers at the top and left sides of the Preview Area. Clicking
the button toggles the ruler display on and off.
■[ ] (Help)
Clicking this button displays the Online Help.
Scanning buttons
■[Scan]
Clicking this button scans an original. When scanning is complete, the Color Network
ScanGear Main Window closes and the scanned image is transferred to the application.
During scanning, a dialog box showing the scanning progress appears. To interrupt
scanning, click [Cancel] in that dialog box.
NOTE
Depending on the application, the Color Network ScanGear Main Window may not close
after scanning is complete. In this case, click [ ] (Exit) in the Color Network ScanGear
Main Window to close it.
■[Preview]
Clicking this button pre-scans the original, and a preview image appears in the Preview
Area. After changing the scan settings, click this button once again to display a preview of
the image scanned under the new settings. During scanning, [Preview] changes to
[Cancel]. If you interrupt the scanning with [Cancel], the part of the image already
scanned appears in the Preview Area. This button is not available when scanning with the
feeder, or when [Auto] is selected from [Original Size].
■[Clear]
Clicking this button clears the image displayed in the Preview Area. It also cancels the
scanning area setting and enlarged display of the preview image, and then returns the
Preview Area display to the original size.

Color Network ScanGear Main Window 3-11
Before Scanning
3
Preview Area
This area displays a preview of how the image will look after the original is scanned.
Use it to check the image appearance, and to adjust the scanning area selection or
scan settings. Right-clicking on the Preview Area displays a pop-up menu that
provides the following functions.
NOTE
The preview image does not appear when scanning using the feeder or when [Auto] is
selected from [Original Size].
■[Cropping Area]
Displays the [Cropping Area] dialog box, where you can specify the dimensions of the
scanning area. This function cannot be selected with 2-sided scanning, when [Auto-adjust
Orientation] is selected, or when [Auto] or [Different Sizes] is selected from [Original Size].
For instructions on how to specify the scanning area, see "Specifying the Scanning Area,"
on p. 4-8.
■[Unit]
Selects the unit used to specify the scanning area (millimeters, inches, or pixels).
■[Original Frame Erase]
Enables you to specify whether or not to delete a shadow or frame around the original
when scanning. Selecting [On] applies a 2.5 mm white frame around the scanned image.
The [Original Frame Erase] command is not available when [Auto] or [Different Sizes] is
selected from [Original Size], or when the scanning area is specified.
NOTE
The default setting for [Original Frame Erase] is [On]. If you select [Off], streaks may
appear on the scanned image.
Settings
Click the tabs to access the [Main], [Options], and [Scanner Info] sheets. Use the
[Main] sheet to made scan settings. Use the [Options] sheet to specify processing
options. Use the [Scanner Info] sheet to display information about the currently
selected scanner. For details about the settings on each sheet, refer to the Online
Help on that sheet.
NOTE
The available settings vary depending on the scanner model you are using.

CHAPTER
4-1
4
Scanning
This chapter describes the basic procedure for using Color Network ScanGear to scan with a
TWAIN-compliant application.
Scanning from the Platen Glass . . . . . . . . . . . . . . . . . . . . . . . . . . . . . . . . . . . . . . . . . . . . 4-2
Scanning from the Feeder . . . . . . . . . . . . . . . . . . . . . . . . . . . . . . . . . . . . . . . . . . . . . . . . 4-4
Scanning from the Feeder . . . . . . . . . . . . . . . . . . . . . . . . . . . . . . . . . . . . . . . . . . . . . . . . . . . . . .4-4
Ensuring Scanned Originals are Correctly Oriented . . . . . . . . . . . . . . . . . . . . . . . . . . . . . . . . . .4-6
Scanning Different Sized Originals Together . . . . . . . . . . . . . . . . . . . . . . . . . . . . . . . . . . . . . . . .4-7
Specifying the Scanning Area. . . . . . . . . . . . . . . . . . . . . . . . . . . . . . . . . . . . . . . . . . . . . . 4-8
Department ID Management . . . . . . . . . . . . . . . . . . . . . . . . . . . . . . . . . . . . . . . . . . . . . 4-10
What Is Department ID Management? . . . . . . . . . . . . . . . . . . . . . . . . . . . . . . . . . . . . . . . . . . . .4-10
Using Department ID Management when Scanning . . . . . . . . . . . . . . . . . . . . . . . . . . . . . . . . .4-10
Summary of Important Features and Settings . . . . . . . . . . . . . . . . . . . . . . . . . . . . . . . . 4-13
Basic Settings. . . . . . . . . . . . . . . . . . . . . . . . . . . . . . . . . . . . . . . . . . . . . . . . . . . . . . . . . . . . . . .4-13
Image Processing Settings . . . . . . . . . . . . . . . . . . . . . . . . . . . . . . . . . . . . . . . . . . . . . . . . . . . .4-13
Settings for Scanning from the Feeder. . . . . . . . . . . . . . . . . . . . . . . . . . . . . . . . . . . . . . . . . . . .4-14
Department ID Management Settings . . . . . . . . . . . . . . . . . . . . . . . . . . . . . . . . . . . . . . . . . . . .4-14
Troubleshooting . . . . . . . . . . . . . . . . . . . . . . . . . . . . . . . . . . . . . . . . . . . . . . . . . . . . . . . . . . . . .4-15
Scanning from the Platen Glass
4-2
Scanning
4
Scanning from the Platen Glass
Follow the procedure below to scan from the platen glass.
IMPORTANT
•
If you are using Color Network ScanGear for the first time after installing it, the network
scanner to be used must be selected with the ScanGear Tool. For details, see "Selecting
the Network Scanner to be Used," on p. 3-6.
•
Before scanning, you must first switch the scanner online. For details, see "Switching the
Scanner Online and Offline," on p. 3-2.
1
Start Color Network ScanGear from the application.
For details, see "Starting Color Network ScanGear," on p. 3-8.
2
In the [Main] sheet, select [Platen] for [Original Placement].
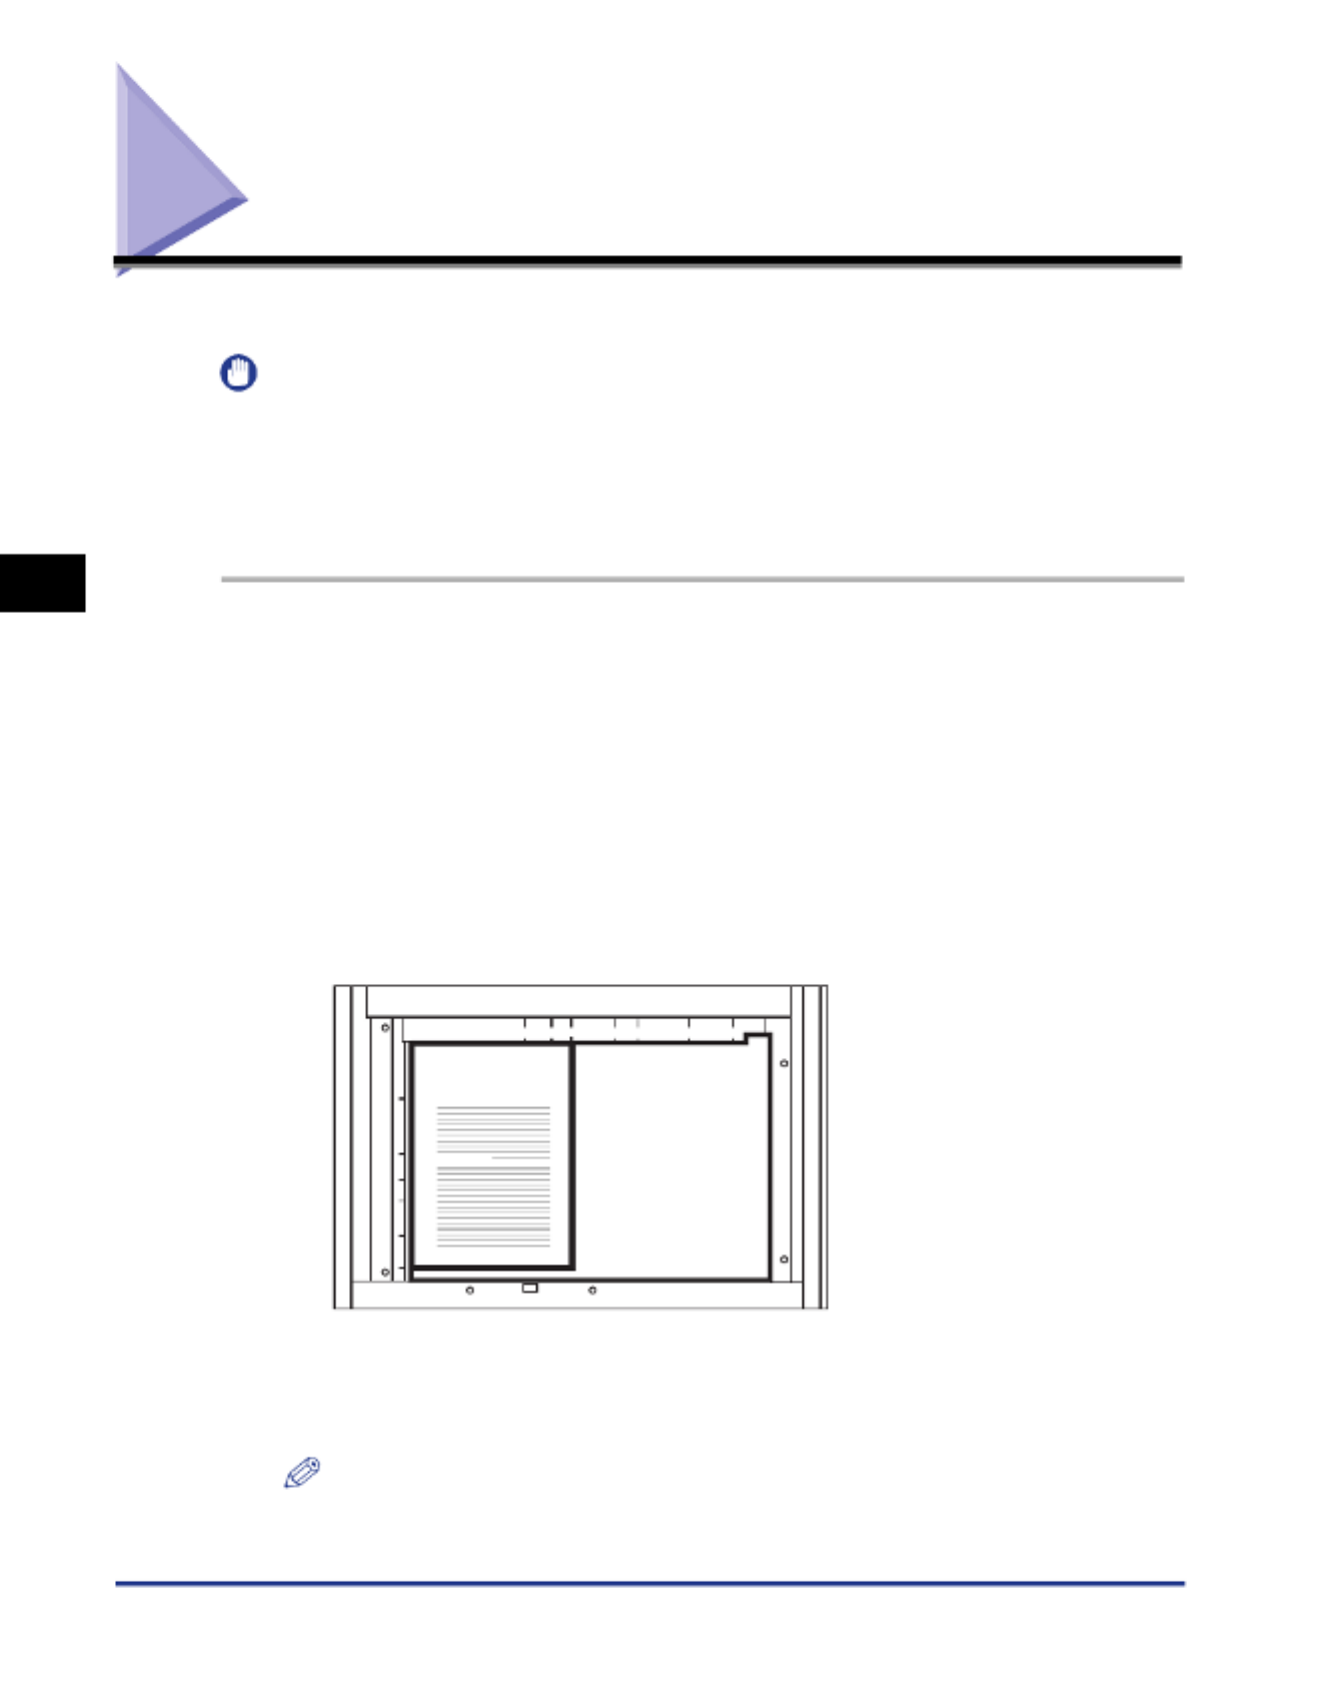
3
Place the original on the platen glass. The original should
have the side to be scanned face down, as shown in the
illustration.
4
In the Color Network ScanGear Main Window, set the Color
Mode, Resolution, and other scan settings.
NOTE
The available settings and ranges vary depending on the printer model you are
using.
ABC

Scanning from the Platen Glass 4-3
Scanning
4
5
To preview the image, click [Preview].
A preview image appears in the Preview Area.
NOTE
You can use the preview image to do the following:
- Specify the scanning area. For details, see "Specifying the Scanning Area," on p.
4-8.
- Use the toolbar to enlarge the image display, or use the settings in the [Options]
sheet to adjust the appearance of the image.
6
Click [Scan].
Scanning starts.
When scanning is complete, the Color Network ScanGear Main Window closes
and the scanned image is transferred to the application.
IMPORTANT
•
After clicking [Scan], do not perform any operation in the Color Network ScanGear
Main Window until the dialog box showing the scanning progress appears.
•
If Color Network ScanGear does not automatically close after scanning, click [ ]
(Exit) to close it.
•
Be sure to close the Color Network ScanGear Main Window before exiting the
application.

Scanning from the Feeder
4-4
Scanning
4
Scanning from the Feeder
When using Color Network ScanGear to scan with the feeder, you can scan a
number of originals in succession.
Scanning from the Feeder
Follow the procedure below to scan from the feeder.
IMPORTANT
•
If you are using Color Network ScanGear for the first time after installing it, the network
scanner to be used must be selected with the ScanGear Tool. For details, see "Selecting
the Network Scanner to be Used," on p. 3-6.
•
Before scanning, you must first switch the scanner online. For details, see "Switching the
Scanner Online and Offline," on p. 3-2.
•
When scanning from the feeder, use only standard size originals. To scan originals that
are not a standard size, use the platen glass.
1
Start Color Network ScanGear from the application.
For details, see the section, "Starting Color Network ScanGear," on p. 3-8.
2
In the [Main] sheet, select the original sides to be scanned for
[Original Placement].
For 1-sided originals, select [Feeder (1-sided)]; for 2-sided originals, select
[Feeder (2-sided)] or [Feeder (Hi-Speed 2-sided)].
3
In the [Main] sheet, click [Orientation] to display the
[Orientation] dialog box, and then set the feeding direction.
For 2-sided originals, specify the Book Opening direction (i.e. the relation
between the front and back sides).
For details about the setting, see "Ensuring Scanned Originals are Correctly
Oriented," on p. 4-6.

Scanning from the Feeder
4-6
Scanning
4
Ensuring Scanned Originals are Correctly Oriented
To ensure that originals scanned from the feeder are correctly oriented on the
computer screen, use automatic orientation detection or set the feeding direction of
the originals in the feeder. Follow the procedure below to make these settings in the
Color Network ScanGear Main Window.
To Automatically Recognize the Orientation of the Original
In the [Main] sheet, select [Auto-adjust Orientation]. During scanning, the
orientation of the original is detected automatically, and the scanned image is
rotated if necessary, so that it appears upright on the computer screen.
To Set the Feeding Direction of the Originals
Follow the procedure below to set the feeding direction of originals.
1
In the [Main] sheet, click [Orientation].
The [Orientation] dialog box appears.
2
Select the orientation of the originals to be loaded into the
feeder for [Feeding Direction].
For 2-sided originals, also set [Book Opening] to indicate the relation between
the front and back sides of a 2-sided original.

Scanning from the Feeder 4-7
Scanning
4
3
When the settings are complete, click [OK] to close the dialog
box.
Scanning Different Sized Originals Together
You can to load originals of different sizes together in the feeder and scan them in
one operation. To do this, make the following settings in the Color Network
ScanGear Main Window.
For Defined Paper Sizes
1
In the [Main] sheet, select [Different Sizes] for [Original Size].
The [Different Sizes] dialog box appears.
2
Check the possible combinations and select the appropriate
combination of original sizes.
For sizes such as A3 and A4, where the longer side of the smaller original is the
same size as the shorter side of the larger original, select [Same Width]. For
combinations of sizes such as A3 and B4 with no sides of the same length in
common, select [Different Width].
3
After making the settings, click [OK] to close the dialog box.
For Undefined Paper Sizes
1
In the [Main] sheet, select [Custom] for [Original Size].
The width of all paper sizes must be the same.
Product Specifications
| Brand: | Canon |
| Category: | Printer |
| Model: | CLC2620 |
Do you need help?
If you need help with Canon CLC2620, ask a question below and other users will answer you
Printer Canon User Manuals

23 October 2024
18 October 2024
15 October 2024
15 October 2024
15 October 2024
15 October 2024
15 October 2024
15 October 2024
15 October 2024
14 October 2024
Printer User Manuals
- Printer Sony
- Printer Samsung
- Printer HP
- Printer Epson
- Printer D-Link
- Printer StarTech.com
- Printer Kogan
- Printer Kyocera
- Printer Zebra
- Printer Kodak
- Printer CSL
- Printer Posiflex
- Printer Ricoh
- Printer Brother
- Printer Pantum
- Printer Star Micronics
- Printer Xerox
- Printer Nisca
- Printer Custom
- Printer Microboards
- Printer HiTi
- Printer Fujifilm
- Printer Oce
- Printer TSC
- Printer IDP
- Printer Datamax-O'neil
- Printer Tally Dascom
- Printer Sawgrass
Latest Printer User Manuals
27 October 2024
26 October 2024

25 October 2024
25 October 2024

24 October 2024
24 October 2024
24 October 2024
23 October 2024

22 October 2024
22 October 2024