HP Officejet E609N Manual
Read below 📖 the manual in Italian for HP Officejet E609N (168 pages) in the Printer category. This guide has been helpful for 11 people and has been rated 4.5 stars on average by 2 users
Page 1/168


HP Officejet 6000 (E609) Printer
Series
User Guide

Copyright information
© 2009 Copyright Hewlett-Packard
Development Company, L.P.
Edition 1, 6/2009
Hewlett-Packard Company
notices
The information contained in this
document is subject to change without
notice.
All rights reserved. Reproduction,
adaptation, or translation of this
material is prohibited without prior
written permission of Hewlett-Packard,
except as allowed under copyright laws.
The only warranties for HP products
and services are set forth in the express
warranty statements accompanying
such products and services. Nothing
herein should be construed as
constituting an additional warranty. HP
shall not be liable for technical or
editorial errors or omissions contained
herein.
Acknowledgements
Windows and Windows XP are U.S.
registered trademarks of Microsoft
Corporation. Windows Vista is either a
registered trademark or trademark of
Microsoft Corporation in the United
States and/or other countries.
ENERGY STAR is a registered mark
owned by the U.S. government.
Safety information
Always follow basic safety precautions
when using this product to reduce risk
of injury from fire or electric shock.
1. Read and understand all instructions
in the documentation that comes with
the device.
2. Observe all warnings and
instructions marked on the product.
3. Unplug this product from wall outlets
before cleaning.
4. Do not install or use this product near
water, or when you are wet.
5. Install the product securely on a
stable surface.
6. Install the product in a protected
location where no one can step on or
trip over the line cord, and the line cord
cannot be damaged.
7. If the product does not operate
normally, see Maintain and
troubleshoot.
8. There are no user-serviceable parts
inside. Refer servicing to qualified
service personnel.
9. Use only the external power adaptor/
battery provided with the device.

Print and evaluate a print quality report....................................................................................60
To print a print quality report...............................................................................................60
To evaluate the Print Quality Diagnostic Page...................................................................61
Ink Levels......................................................................................................................61
Good color bars............................................................................................................61
Ragged, irregularly streaked, or faded bars.................................................................62
Regular white streaks in the bars.................................................................................63
Bar colors are not uniform............................................................................................63
Large Black Font Text...................................................................................................64
Alignment Patterns.......................................................................................................65
If you see no defects....................................................................................................65
Troubleshooting tips and resources.........................................................................................65
Solve printing problems............................................................................................................66
The device shuts down unexpectedly.................................................................................66
Device takes a long time to print........................................................................................66
Blank or partial page printed...............................................................................................67
Something on the page is missing or incorrect...................................................................67
Placement of the text or graphics is wrong.........................................................................68
Print troubleshooting.................................................................................................................69
Envelopes print incorrectly.................................................................................................69
The product is not responding............................................................................................70
The product prints meaningless characters........................................................................73
Nothing happens when I try to print....................................................................................73
The margins are not printing as expected..........................................................................76
Text or graphics are cut off at the edge of the page...........................................................77
A blank page came out while printing.................................................................................79
Print quality troubleshooting.....................................................................................................80
Wrong, inaccurate, or bleeding colors................................................................................80
Ink is not filling the text or graphics completely..................................................................83
The printout has a horizontal band of distortion near the bottom of a borderless
print.....................................................................................................................................85
Printouts have horizontal streaks or lines...........................................................................86
Printouts are faded or have dull colors...............................................................................88
Printouts seem blurry or fuzzy............................................................................................90
Printouts are slanted or skewed.........................................................................................91
Ink streaks on the back of the paper..................................................................................92
Paper is not picked up from the input tray..........................................................................93
Poor black text....................................................................................................................94
The product prints slowly....................................................................................................96
Advanced printhead maintenance......................................................................................96
Clean the printhead......................................................................................................97
Align the printhead........................................................................................................98
Solve paper-feed problems......................................................................................................99
Solve device management problems.....................................................................................100
Embedded Web server cannot be opened.......................................................................100
Solve network problems.........................................................................................................101
Contents
3

Solve wireless problems.........................................................................................................102
Basic wireless troubleshooting.........................................................................................102
Advanced wireless troubleshooting..................................................................................103
Make sure your computer is connected to your network............................................103
Make sure that the HP device is connected to your network......................................105
Check to see if the firewall software is blocking communication................................105
Make sure the HP device is online and ready............................................................106
Your wireless router is using a hidden SSID..............................................................106
Make sure the wireless version of the HP device is set as the default printer driver
(Windows only)...........................................................................................................106
Make sure the HP Network Devices Support service is running (Windows only).......107
Add hardware addresses to a wireless access point (WAP)......................................107
Troubleshoot installation issues.............................................................................................108
Hardware installation suggestions....................................................................................108
Software installation suggestions.....................................................................................109
Solve network problems...................................................................................................110
4

Clear jams...............................................................................................................................111
Clear a jam in the device..................................................................................................111
Tips for avoiding jams.......................................................................................................112
Errors (Windows)....................................................................................................................112
Printhead Problem - The printhead appears to be missing or damaged..........................113
Incompatible Printhead.....................................................................................................113
Printhead problem and advanced printhead maintenance...............................................113
Printhead problem - The following printhead has a problem......................................113
Advanced printhead maintenance..............................................................................113
Device Disconnected........................................................................................................118
Ink Alert.............................................................................................................................118
HP recommends you have a replacement available for when print quality becomes
no longer acceptable..................................................................................................119
The amount of ink in the following cartridge may be low enough to cause poor print
quality and cartridge changes may be required soon. HP recommends you have
replacement cartridges available to install when print quality is no longer
acceptable..................................................................................................................119
Ink system failure........................................................................................................119
Cartridge Problem.............................................................................................................120
The following cartridge appears to be missing or damaged.......................................120
Cartridge(s) in Wrong Slot - The following cartridges are in the wrong slots..............120
Cartridge Problem.............................................................................................................120
Paper Mismatch................................................................................................................120
The cartridge cradle cannot move....................................................................................120
Paper Jam........................................................................................................................121
The printer is out of paper................................................................................................121
Incompatible Cartridge(s).................................................................................................121
The following cartridge is not intended for use in this printer.....................................121
The following cartridges are not intended for use in this printer as it is currently
configured...................................................................................................................121
Printer Offline....................................................................................................................121
Printer Paused..................................................................................................................122
Document failed to print....................................................................................................122
Previously used genuine HP cartridge.............................................................................122
Ink Service Capacity Warning..........................................................................................122
General printer error.........................................................................................................122
6 Control-panel lights reference
Interpreting control-panel lights..............................................................................................124
A HP supplies and accessories
Order printing supplies online.................................................................................................131
Accessories............................................................................................................................131
Supplies..................................................................................................................................131
Ink cartridges....................................................................................................................132
HP media..........................................................................................................................132
B Support and warranty
Obtain electronic support........................................................................................................133
Contents
5

Obtain HP telephone support.................................................................................................134
Before you call..................................................................................................................134
Support process...............................................................................................................134
HP support by phone........................................................................................................135
Phone support period.................................................................................................135
Telephone support numbers.......................................................................................136
Placing a call...............................................................................................................137
After the phone support period...................................................................................137
Additional warranty options..............................................................................................137
HP Quick Exchange Service (Japan)...............................................................................137
HP Korea customer support.............................................................................................138
Hewlett-Packard limited warranty statement..........................................................................139
Ink cartridge warranty information..........................................................................................140
Prepare the device for shipment.............................................................................................140
Remove the rear access panel or duplexer......................................................................140
Remove the output tray....................................................................................................140
Pack the device......................................................................................................................141
C Device specifications
Physical specifications............................................................................................................142
Product features and capacities.............................................................................................142
Processor and memory specifications....................................................................................142
System requirements..............................................................................................................143
Network protocol specifications..............................................................................................144
Embedded Web server specifications....................................................................................144
Print resolution........................................................................................................................144
Environmental specifications..................................................................................................145
Electrical specifications..........................................................................................................145
Acoustic emission specifications (print in Draft mode, noise levels per ISO 7779)................145
D Regulatory information
FCC statement........................................................................................................................146
Notice to users in Korea.........................................................................................................147
VCCI (Class B) compliance statement for users in Japan......................................................147
Notice to users in Japan about the power cord......................................................................147
Toxic and hazardous substance table....................................................................................147
LED indicator statement.........................................................................................................148
Regulatory information for wireless products.........................................................................148
Exposure to radio frequency radiation..............................................................................148
Notice to users in Brazil....................................................................................................148
Notice to users in Canada................................................................................................148
Notice to users in Taiwan.................................................................................................149
European Union regulatory notice....................................................................................149
Regulatory model number......................................................................................................150
Declaration of conformity........................................................................................................150
6

Accessibility
The device provides a number of features that make it accessible for people with
disabilities.
Visual
The device software is accessible for users with visual impairments or low vision through
the use of your operating system's accessibility options and features. It also supports
most assistive technology such as screen readers, Braille readers, and voice-to-text
applications. For users who are color blind, colored buttons and tabs used in the software
and on the control panel have simple text or icon labels that convey the appropriate action.
Mobility
For users with mobility impairments, the device software functions can be executed
through keyboard commands. The software also supports Windows accessibility options
such as StickyKeys, ToggleKeys, FilterKeys, and MouseKeys. The device doors, buttons,
paper trays, and paper guides can be operated by users with limited strength and reach.
Support
For more details about the accessibility of this product and HP's commitment to product
accessibility, visit HP's Web site at www.hp.com/accessibility.
For accessibility information for Mac OS X, visit the Apple Web site at www.apple.com/
accessibility.
Understand the device parts
• Front view
• Control panel
• Back view
Front view
Chapter 1
10 Get started

1 Control panel
2 Output tray
3 Tray 1
4 Width guides
5 Top cover
6 Ink cartridges
7 Printhead latch
8 Printhead
Control panel
For more information about interpreting control-panel lights, see Control-panel lights
reference.
1Power button and light
2Resume button and light
3Cancel button
4Network button (available with some models)
Wireless button (available with some models)
5 Ink cartridge lights
Understand the device parts 11

Back view
1 Rear universal serial bus (USB) port
2 Ethernet network port
3 Automatic two-sided printing accessory (duplexer) (some models only)
4 Power input
5 Rear access panel
Connection information
Description Recommended number
of connected
computers for best
performance
Supported software
features
Setup instructions
USB connection One computer connected
with a USB cable to the
rear USB 2.0 high-speed
port on the device.
All features are
supported.
See Configure the device
(Windows) or Configure
the device (Mac OS X).
Ethernet (wired)
connection
Up to five computers
connected to the device
using a hub or router.
All features are
supported.
Follow the instructions in
To share the device on a
locally shared network in
this guide for further
instructions.
Printer sharing Up to five computers.
The host computer must
be turned on at all times,
or the other computers
cannot print to the device.
All features resident on
the host computer are
supported. Only print is
supported from the other
computers.
Follow the instructions in
To share the device on a
locally shared network.
802.11 wireless (some
models only)
Up to five computers
connected to the device
using a hub or router.
All features are
supported.
Follow the instructions in
the wireless getting
started guide or see Set
up the device for wireless
communication.
Chapter 1
12 Get started

Turn off the device
Turn off the HP product by pressing the Power button located on the product. Wait until
the Power light turns off before unplugging the power cord or turning off a power source.
If you improperly turn off the HP product, the print carriage might not return to the correct
position, which might cause problems with the printhead and print quality issues.
Eco-Tips
HP is committed to helping customers reduce their environmental footprint. HP has
provided the Eco-Tips below to help you focus on ways to assess and reduce the impact
of your printing choices. In addition to specific features in this product, please visit the HP
Eco Solutions Web site for more information on HP's environmental initiatives.
www.hp.com/hpinfo/globalcitizenship/environment/
•Duplex printing: Use Paper-saving Printing to print two-sided documents with
multiple pages on the same sheet to reduce paper usage. For more information, see
Print on both sides (duplexing).
•Smart Web printing: The HP Smart Web Printing interface includes a Clip Book and
Edit Clips window where you can store, organize, or print clips you have gathered
from the Web. For more information, see Print a Web page (Windows only).
•Energy savings information: To determine the ENERGY STAR® qualification
status for this product, see Power consumption.
•Recycled materials: For more information regarding recycling of HP products,
please visit:
www.hp.com/hpinfo/globalcitizenship/environment/recycle/
Eco-Tips 13

2 Install the accessories
This section contains the following topics:
• Install the duplexer (available on some models)
• Turn on accessories
Install the duplexer (available on some models)
You can print on both sides of a sheet of paper automatically when the optional automatic
two-sided printing accessory (duplexer) is installed. For information on using the
duplexer, see Print on both sides (duplexing).
Install the duplexer
1. Push the buttons on the rear access panel and remove the panel from the device.
2. Slide the duplexer into the device until the unit locks into place. Do not press the
buttons on either side of the duplexer when installing the unit; use them only for
removing the unit from the device.
Turn on accessories
This section contains the following topics:
• Activate and deactivate the duplexer on the device
• To turn accessories on or off on Windows computers
• To turn on accessories on Macintosh computers
Activate and deactivate the duplexer on the device
When you install or remove the duplexer, you need to activate or deactivate the accessory
on the device control panel.
To activate or deactivate the duplexer
▲Press and hold Cancel button and Network button for five seconds. After you
release the buttons, the device will print a report letting you know that the duplexer
has been activated.
14 Install the accessories

To turn accessories on or off on Windows computers
1. Click on the Start button on the desktop.
2. Select Printers and Faxes, right-click on your device, and then select Properties.
3. Click the Device Settings tab, and then click Installed or Not Installed to turn the
duplexer on or off.
To turn on accessories on Macintosh computers
1. From the desktop, click System Preferences under the Apple menu.
2. Click Print & Fax.
3. Select the device, and then click Printer Setup (Mac OS X 10.4) or Options &
Supplies... (Mac OS X 10.5).
4. Do one of the following:
a.Mac OS X (10.4): Select Installable Options from the drop-down menu.
b.Mac OS X (10.5) Select the Driver tab.
5. Select the check box next to HP Two-sided Printing Accessory (Duplexer) to turn
on the duplexer. Clear the check box to turn off the duplexer.
Turn on accessories 15

◦Media that is heavily textured, embossed, or does not accept ink well
◦Media that is too lightweight or stretches easily
Cards and envelopes
• Avoid envelopes that have a very slick finish, self-stick adhesives, clasps, or windows.
Also avoid cards and envelopes with thick, irregular, or curled edges, or areas that
are wrinkled, torn, or otherwise damaged.
• Use tightly constructed envelopes, and make sure the folds are sharply creased.
• Load envelopes aligned according to the graphic.
Photo media
• Use the Best mode to print photographs. Note that in this mode, printing takes longer
and more memory is required from your computer.
• Remove each sheet as it prints and set it aside to dry. Allowing wet media to stack
up may cause smearing.
Transparencies
• Insert transparencies with the rough side down and the adhesive strip pointing
towards the back of the device.
• Remove each sheet as it prints and set it aside to dry. Allowing wet media to stack
up may cause smearing.
Custom-sized media
• Use only custom-sized media that is supported by the device.
• If your application supports custom-sized media, set the media size in the application
before printing the document. If not, set the size in the printer driver. You might need
to reformat existing documents to print them correctly on custom-sized media.
Understand specifications for supported media
Use the Understand supported sizes and Understand supported media types and
weights tables to determine the correct media to use with your device and determine the
features that will work with your media.
Always use the correct media-type setting in the printer driver, and configure the trays for
the correct media type. HP recommends testing any paper before buying it in large
quantities.
• Understand supported sizes
• Understand supported media types and weights
Select print media 19

Media size Input tray Duplexer (some
models)
Cards
Index card (76.2 x 127 mm; 3 x 5 inches)
Index card (102 x 152 mm; 4 x 6 inches)
Index card (127 x 203 mm; 5 x 8 inches)
A6 card (105 x 148.5 mm; 4.13 x 5.83 inches)
Borderless A6 card (105 x 148.5 mm; 4.13 x 5.83
inches)
Hagaki** (100 x 148 mm; 3.9 x 5.8 inches)
Ofuku hagaki**
Borderless hagaki (100 x 148 mm; 3.9 x 5.8 inches)
**
Photo media
Photo media (102 x 152 mm; 4 x 6 inches)
Photo media (5 x 7 inches)
Photo media (8 x 10 inches)
Photo media (10 x 15 cm)
Photo L (89 x 127 mm; 3.5 x 5 inches)
2L (178 x 127 mm; 7.0 x 5.0 inches)
Borderless photo media (102 x 152 mm; 4 x 6
inches)
Borderless photo media (5 x 7 inches)
Borderless photo media (8 x 10 inches)
Borderless photo media (8.5 x 11 inches)
Borderless photo media (10 x 15 cm)
Borderless Photo L (89 x 127 mm; 3.5 x 5 inches)
Borderless 2L (178 x 127 mm; 7.0 x 5.0 inches)
Borderless B5 (182 x 257 mm; 7.2 x 10.1 inches)
Borderless B7 (88 x 125 mm; 3.5 x 4.9 inches)
Borderless 4 x 6 tab (102 x 152 mm; 4 x 6 inches)
(continued)
Select print media 21

Media size Input tray Duplexer (some
models)
Borderless 10 x 15 cm tab
Borderless 4 x 8 tab (10 x 20 cm)
Borderless HV (101 x 180 mm; 4.0 x 7.1 inches)
Borderless double A4 (210 x 594 mm; 8.3 x 23.4
inches)
4 x 6 tab (102 x 152 mm; 4 x 6 inches)
10 x 15 cm tab
4 x 8 tab / 10 x 20 cm tab
Other media
Custom-sized media between 76.2 to 216 mm wide
and 101 to 762 mm long (3 to 8.5 inches wide and 4
to 30 inches long)
Panorama (4 x 10 inches, 4 x 11 inches, and 4 x 12
inches)
Borderless panorama (4 x 10 inches, 4 x 11 inches,
and 4 x 12 inches)
** The device is compatible with plain and inkjet hagaki from Japan Post only. It is not
compatible with photo hagaki from Japan Post.
Understand supported media types and weights
Tray Type Weight Capacity
Input tray Paper 60 to 105 g/m
2
(16 to 28 lb bond)
Up to 250 sheets of plain
paper
(25 mm or 1 inch
stacked)
Transparencies Up to 70 sheets
(17 mm or 0.67 inch
stacked)
Photo media 280 g/m2
(75 lb bond)
Up to 100 sheets
(17 mm or 0.67 inch
stacked)
Labels Up to 100 sheets
(17 mm or 0.67 inch
stacked)
Envelopes 75 to 90 g/m2
(20 to 24 lb bond
envelope)
Up to 30 sheets
(17 mm or 0.67 inch
stacked)
Chapter 3
(continued)
22 Use the device
Tray Type Weight Capacity
Cards Up to 200 g/m2
(110 lb index)
Up to 80 cards
Duplexer
(available
on some
models)
Paper 60 to 105 g/m2
(16 to 28 lb bond)
Not applicable
Output tray All supported media Up to 50 sheets of plain
paper (text printing)
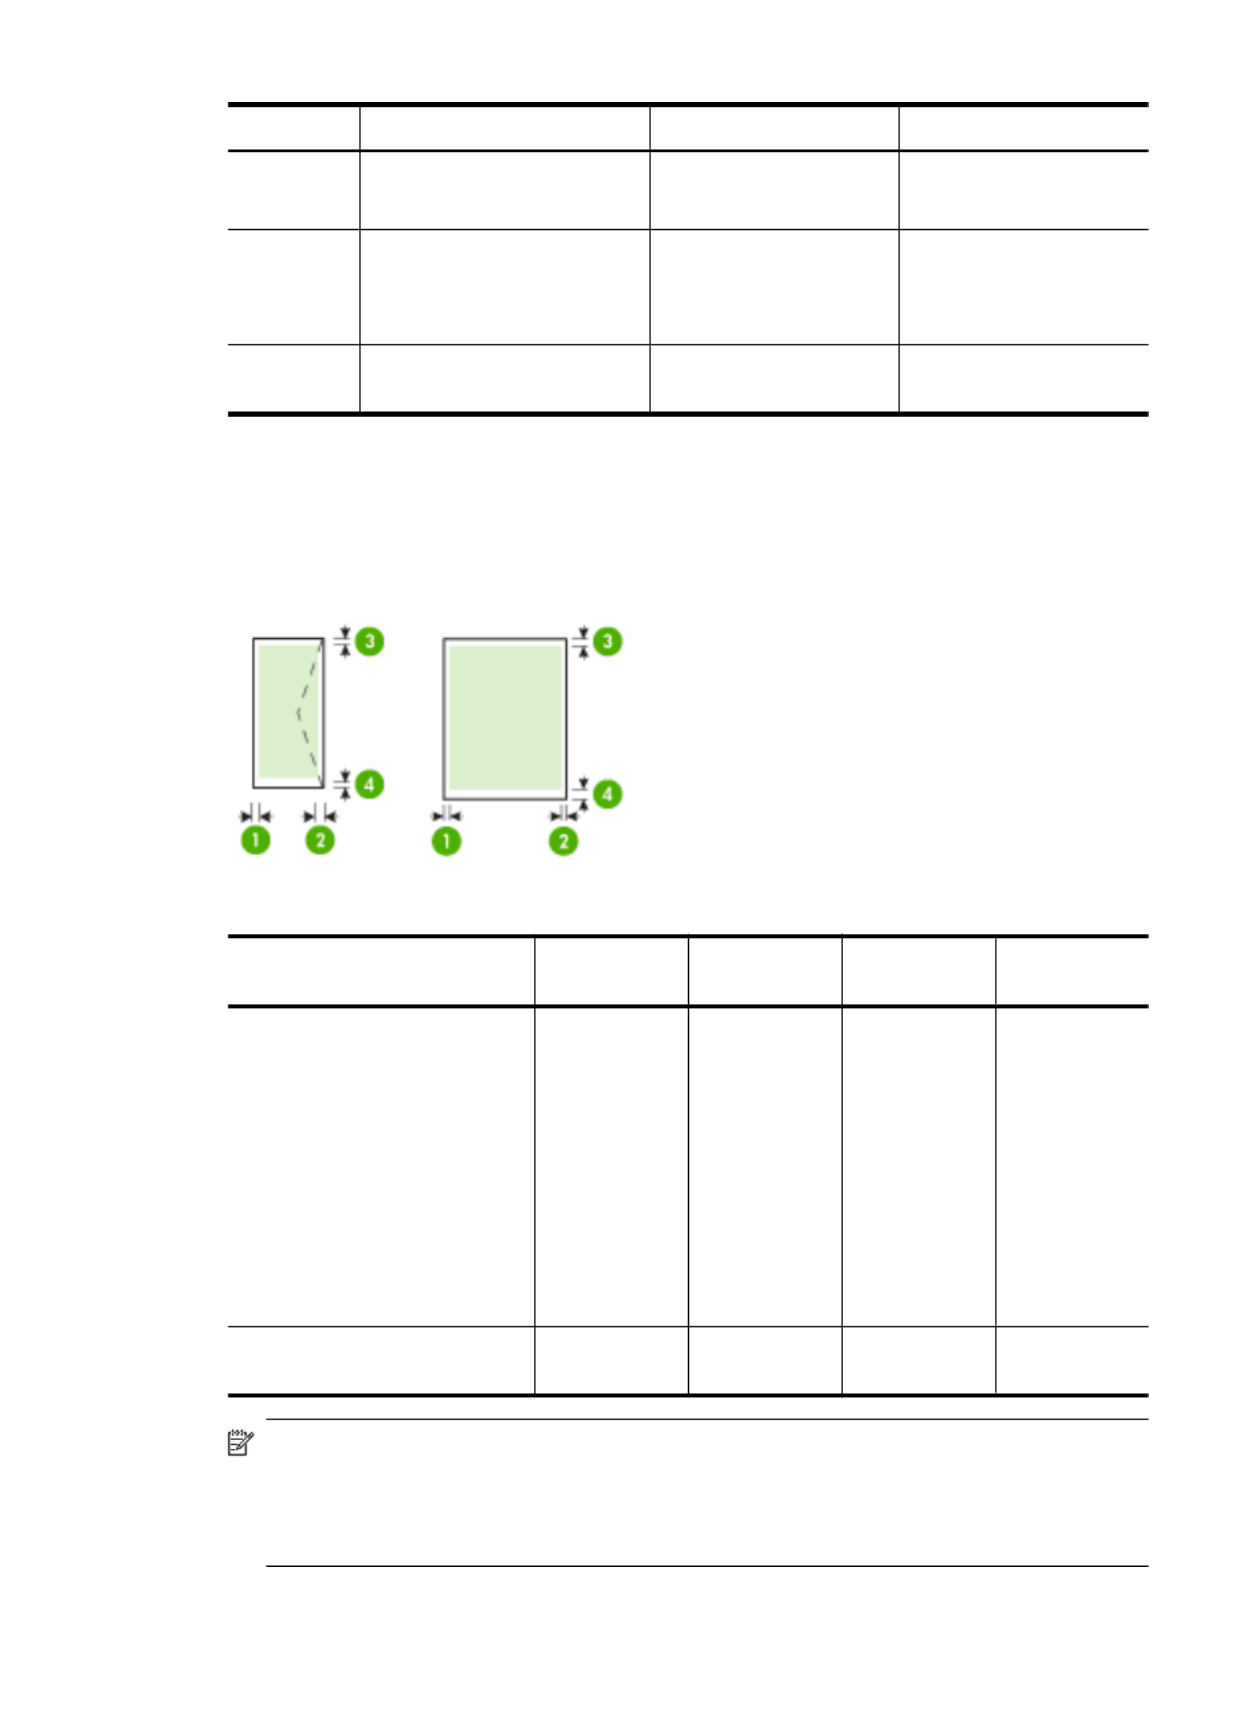
Set minimum margins
The document margins must match (or exceed) these margin settings in portrait
orientation.
Media (1) Left
margin
(2) Right
margin
(3) Top
margin
(4) Bottom
margin
U.S. Letter
U.S. Legal
A4
U.S. Executive
B5
A5
Cards
Custom-sized media
Photo media
3.3 mm (0.13
inch)
3.3 mm (0.13
inch)
3.3 mm (0.13
inch)
3.3 mm (0.13
inch)
Envelopes 3.3 mm (0.13
inch)
3.3 mm (0.13
inch)
3.3 mm (0.13
inch)
14.9 mm
(0.59 inch)
NOTE: If you are using the duplexer to print on both sides of the paper, the minimum
top and bottom margins must match or exceed 14.9 mm (0.59 inch).
NOTE: For Mac OS X, the minimum bottom margin for all the media (except
envelope, Hagaki, and Ofuku Hagaki) is 15 mm (0.586 inch).
(continued)
Select print media 23

NOTE: Open the file in a software application and assign the image size. Make sure
the size corresponds to the media size on which you are printing the image.
You can also gain access to this feature from the Printing Shortcuts tab (Windows
only). Open the printer driver, select the Printing Shortcuts tab, and select the
printing shortcut for this print job from the drop-down list.
NOTE: Not all applications support borderless printing.
• To print a borderless document (Windows)
• To print a borderless document (Mac OS X)
To print a borderless document (Windows)
1. Load the appropriate media. For more information, see Load media.
2. Open the file that you want to print.
3. From the application, open the printer driver:
a. Click File, and then click Print.
b. Click Properties, Setup, or Preferences.
4. Select the print settings shortcut you want to use.
5. Change any other print settings, and then click OK.
6. Print the document.
7. If you printed on photo media with a tear-off tab, remove the tab to make the document
completely borderless.
To print a borderless document (Mac OS X)
1. Load the appropriate media. For more information, see Load media.
2. Open the file that you want to print.
3. Click File, and then click Page Setup.
NOTE: Some Mac OS X (v10.5) applications do not have a Page Setup menu,
it is included in the Print menu.
4. Select the borderless media size, and then click OK.
5. Click File, and then click Print.
6. Open the Paper Type/Quality panel.
7. Click the Paper tab, and then select the media type from the Paper type drop-down
list.
8. Check the Borderless Printing tab and make sure Borderless is selected, and
change the Borderless Expansion if you want.
9. If you are printing photos, select Best from the Quality drop-down list. Alternatively,
select Maximum dpi, which provides up to 4800 x 1200 optimized dpi. For color
printing and 1200 input dpi. This setting might temporarily use a large amount of hard
disk space (400 MB or more) and will print more slowly.
10. Select the media source.
11. Change any other print settings, and then click Print.
12. If you printed on photo media with a tear-off tab, remove the tab to make the document
completely borderless.
Print borderless 29

Use this tool... to do the following...
•Configure network settings: Click the
Networking tab, and then click an option in the
left pane.
•Order supplies: On any tab, click the Order
Supplies button, and then follow the onscreen
instructions.
•Support: On any tab, click the Support button,
and then select a support option.
Toolbox (Windows) •Perform device maintenance tasks: Click the
Device Services tab.
•Configure network settings: Click the Network
Settings tab, and then click Change Settings to
launch the Network Toolbox.
Network Toolbox View and change network settings. From the
Toolbox, click the Network Settings tab.
•Change settings: click the Change Settings
button.
•Run a network diagnostic (to check the
network printer connection):
◦If the printer is not connected, click Change
Settings, and then click Run Network
Diagnostic.
◦If the printer is connected, when the toolbox
opens, click the Utilities tab, and then click
Run Network Diagnostic.
•Change the printer's IP address: In the
Network Settings tab, click Wired or Wireless
tab, depending on the connection, edit the IP
Settings, and then click OK.
•Change the printer's DNS setting: In the
Network Settings tab, click Wired or Wireless
tab, depending on the connection, edit the DNS
Settings, and then click OK.
•Print Wireless Network Test Report: In the
Network Settings tab, click the Utilities tab, and
then click Print Wireless Network Test
Report.
HP Printer Utility (Mac OS X) Perform device maintenance tasks: Open the
Information and Support panel, and then click the
option for the task that you want to perform.
Use device management tools
The following lists common tools that can be used to manage the device.
• Embedded Web server
• Toolbox (Windows)
• Use the HP Solution Center (Windows)
• HP Printer Utility (Mac OS X)
• Use the HP Device Manager (Mac OS X)
(continued)
Use device management tools 33
Product Specifications
| Brand: | HP |
| Category: | Printer |
| Model: | Officejet E609N |
Do you need help?
If you need help with HP Officejet E609N, ask a question below and other users will answer you
Printer HP User Manuals

22 October 2024
21 October 2024
21 October 2024
20 October 2024
20 October 2024
20 October 2024
19 October 2024
19 October 2024
19 October 2024
13 October 2024
Printer User Manuals
- Printer Sony
- Printer Samsung
- Printer Epson
- Printer D-Link
- Printer StarTech.com
- Printer Kogan
- Printer Kyocera
- Printer Zebra
- Printer Kodak
- Printer CSL
- Printer Canon
- Printer Posiflex
- Printer Ricoh
- Printer Brother
- Printer Pantum
- Printer Star Micronics
- Printer Xerox
- Printer Nisca
- Printer Custom
- Printer Microboards
- Printer HiTi
- Printer Fujifilm
- Printer Oce
- Printer TSC
- Printer IDP
- Printer Datamax-O'neil
- Printer Tally Dascom
- Printer Sawgrass
Latest Printer User Manuals

27 October 2024
26 October 2024

25 October 2024
25 October 2024

24 October 2024
24 October 2024
24 October 2024
23 October 2024
23 October 2024
22 October 2024